
guides6 min read
Polymer Clay Trinket Dishes, Forms, and Rims
Use a documented trinket-dish project as the starting point, verify the form and package bake, and keep the result decorative unless the maker supports another use.
Open the guide

Lookbook view
Styled context
Treat this as a starting point for inspiration and experimentation. The concept and reference imagery here is AI-assisted, and AI helped organize the maker notes. Clay brands, ovens, glues, finishes, and hardware behave differently, so check product instructions and test on scrap before making a batch. Measurements, spacing, and timing are estimates from the reference images. Test them on scrap before making a batch. Some product links on this page are affiliate links. If you buy through them, we may earn a commission at no extra cost to you. Check listing details, dimensions, materials, and fit before you buy. As an Amazon Associate I earn from qualifying purchases. Full disclosures
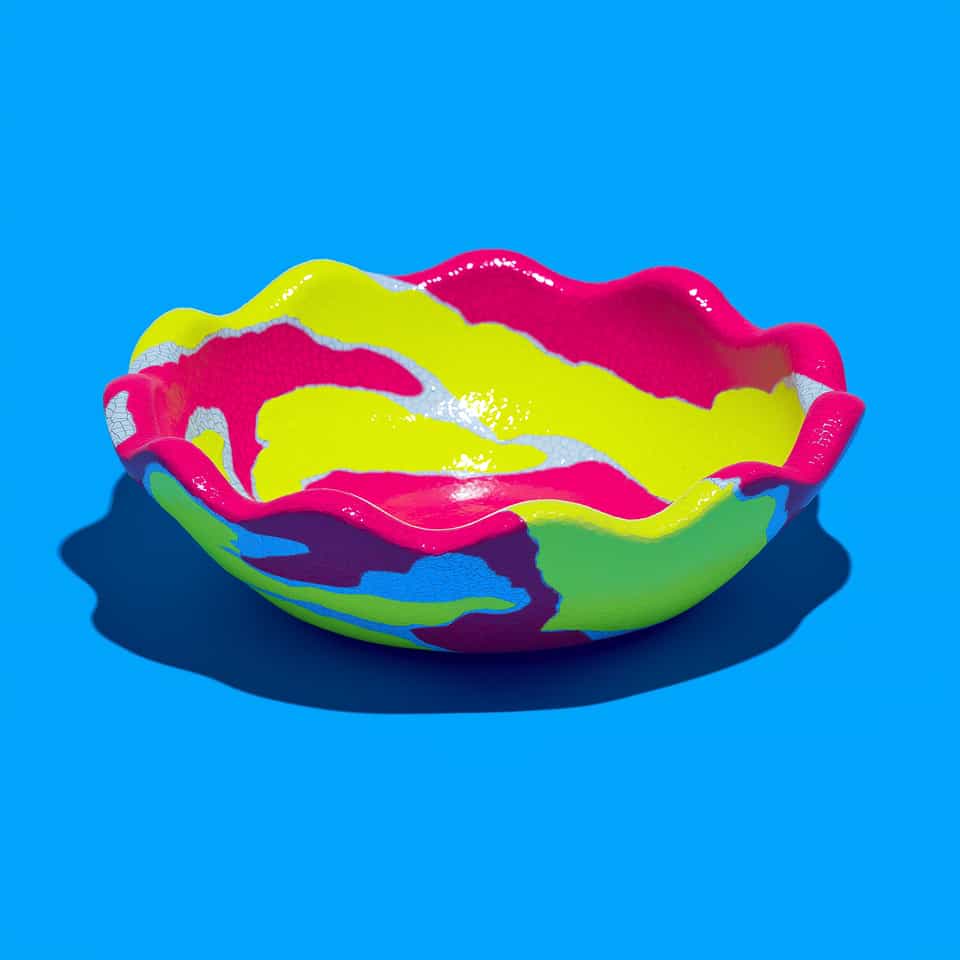
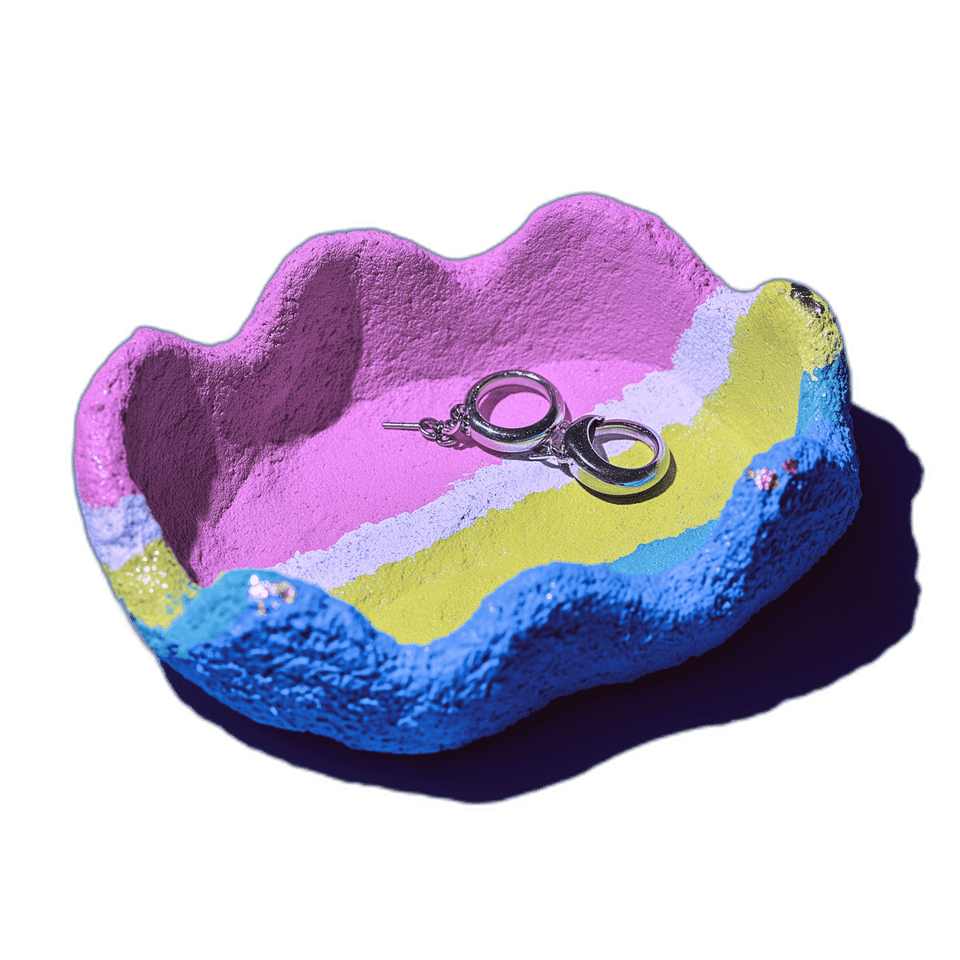
This is a shallow catchall dish for rings, earrings, and small treasures, with a strongly hand-pinched wavy rim and a flowing rainbow surface in hot pink, white, acid yellow, and royal blue. In the lifestyle photo the colors swirl together like marbled stone; in the product photo they read more as broad sweeping stripes, with a heavily pebbled, matte stone-like texture on the outer wall. The build is the same either way: make your patterned slab, drape or press it over a small oven-safe bowl, pinch the rim into waves, then bake the dish right on the form so the curve holds. It is a decorative piece, not for food.
A small shallow oval dish with a softly pink interior floor and a tall, irregular hand-pinched rim that rises and dips like a wave. Rainbow color runs across the floor and up the wall: hot pink, white, acid yellow, and royal blue. In the marble-background photo the colors flow together in soft wavy stripes; the product photo shows wider, more separated bands of pink, a white-and-coral diagonal, yellow, and a heavily stippled royal-blue outer wall flecked with pink. The whole surface is matte and pebbled, like stone, not glossy or resin-coated. It sits as a ring catchall and holds a few small rings or earrings.
A patterned polymer clay slab shaped over a shallow oven-safe form and baked on that form so the curve holds. Roll one even slab, build the surface pattern by your chosen method (marbling, broad joined bands, or scattered terrazzo chips), then drape it over or press it into a small bowl, pinch the rim into hand-shaped waves, and stipple the outside for the stone-like tooth. Smooth the inside, bake on the form, cool fully, then keep it matte or add a thin water-based finish. It is a decorative catchall, not food contact.
Condition each color and roll one even slab against thickness guides, around 1/8 inch (3 to 4 mm), so the floor and rim cure evenly. Dust the roller or pasta machine lightly with cornstarch so nothing sticks. An even slab is the single biggest factor in an even cure, since the bake time follows the thickest spot.
Pattern option A, marbled swirl (the lifestyle look): roll each color into a rope, bundle and twist them together, then fold and roll just a few times. Stop as soon as the colors read as flowing wavy stripes so they do not blend into one muddy color, then roll the marbled clay into your even slab.
Pattern option B, broad joined bands (the product look): cut wide strips of each color, wipe the joining edges with a damp swab to clear cornstarch, and press the strips together edge to edge. Roll lightly over just the seams to weld them without smearing the colors, so each band stays distinct.
Pattern option C, terrazzo chips: chop small bits of contrasting clay, scatter them across a base slab, lay cling film on top, and roll until the chips press flush into one sheet. This gives a speckled stone read in the same palette.
Form option 1, drape over the outside: set the bowl upside down, dust it with cornstarch as a release, lay the slab over the dome, and smooth from the center out to push out air. This gives a smooth underside and an easy rim to trim.
Form option 2, press inside: dust the inside of the bowl with cornstarch, ease the slab down into it, and press it gently against the floor and wall. This gives the smoothest inner curve, which is the surface that shows.
Trim the rim level with a single blade pass, or leave it a touch tall, then pinch and push it by hand into the soft irregular waves from the photos. Keep the wall one even thickness all the way around as you shape the wave.
Smooth the inside floor and any seams with a fingertip or a damp finger, and dab a little isopropyl alcohol on a brush to melt fingerprints, since this is the surface you see and touch.
For the pebbled stone texture on both photos, stipple the raw outer wall and rim with a stiff toothbrush, a coarse sponge, or a crumpled foil ball. Dust the texturing tool with cornstarch so it lifts cleanly. For a smoother dish, skip this and keep the surface plain.
Bake the dish right on its oven-safe form so the curve sets in shape instead of relaxing flat. Set the form on a ceramic tile or cardstock on the center rack, away from the elements, and tent loosely with an inverted foil pan so the high rim does not scorch. Cure at your clay brand's package temperature and time for the slab thickness.
Let the dish cool fully on the form before lifting it off, since warm cured clay is still soft and a curved dish can deform if you pull it early.
Keep the matte stone surface as baked, or brush one thin even coat of a water-based polyurethane such as Varathane satin, tested on baked scrap first so you know it dries clear and stays non-tacky. Build any sheen in thin coats rather than one heavy one.
Set the finished dish on a flat surface to confirm it sits without rocking, then use it as a decorative catchall for rings, earrings, keys, and small treasures only. It is not for food, drink, or anything that touches food, and a finish coat does not change that.
Before you buy, match the sizes and parts to the version you want to make.
The color stock and clay body choices that carry the visible design.
Matches the bright pink band that breaks up the cooler stripes in the dish.
Useful for the warm yellow stripe and for pushing mixed chartreuse notes if needed.
Needed for the pale band and for lightening the brighter colors without muddying them.
Matches the cooler blue stripe that shows most clearly along the outer wall.
A firmer polymer clay ideal for crisp details, pixel grids, and canes to prevent distortion during slicing and assembly.
What you condition with and how you keep the slab even.
Helps you flatten the joined color bands evenly before they go over the dish form.
Roll every sheet to the same calibrated thickness with the ClayBake slab height guides.
Use a ClayBake texture tool for a repeatable surface. A clean household sponge can remain an unlinked option for a looser stipple.
Stencils, blades, and cutters for cleaner outlines.
Hole placement, bake surface, and oven check tools.
Useful for checking the real shelf temperature before baking detailed or supported polymer clay pieces.
Useful for pebbled, fuzzy, or lightly rough surface texture before baking.
Gives flat pieces and small sculpted parts a stable baking surface so they cure without twisting.
Adhesives and attachment choices when the build needs them.
Optional surface products if you want to shift sheen, sand, or coat.
Useful only if you want a very light buffed sheen without covering the matte texture.
A lightweight clay with a cohesive suede finish that holds fine textures without sticky residue.
A polymer-clay-compatible glaze option for a glossy finish. Test it on baked scrap before using it on the finished piece.
Useful add-ons that sit outside the main build tasks.
Each one walks through a technique used in this piece, in full detail.
Use a documented trinket-dish project as the starting point, verify the form and package bake, and keep the result decorative unless the maker supports another use.

Match a documented tile, glass, shaped support, armature, or lightweight core to the part that must stay flat, curved, raised, or aligned.
Custom range
Ask for a build pack to make it yourself (the cutter or tool files, a supply list, and a plan), or ask the studio to make the finished pieces for you.

More pieces with a related form, finish, or making path.
Pin it to a board, copy the link, or keep it saved here while you make your own version.
Tag Clay Bake Studio on Instagram or TikTok so we can see how you adapted it.