guides5 min read
Polymer Clay Cutout Arch Earrings and Hoop Drops
Cutout arches and hoops work best when the wall width is even, the inner opening matches the outer curve, and the hardware choice is made from the finished front view.
Open the guide

Lookbook view
Styled context
Treat this as a starting point for inspiration and experimentation. The concept and reference imagery here is AI-assisted, and AI helped organize the maker notes. Clay brands, ovens, glues, finishes, and hardware behave differently, so check product instructions and test on scrap before making a batch. Measurements, spacing, and timing are estimates from the reference images. Test them on scrap before making a batch. Some product links on this page are affiliate links. If you buy through them, we may earn a commission at no extra cost to you. Check listing details, dimensions, materials, and fit before you buy. As an Amazon Associate I earn from qualifying purchases. Full disclosures
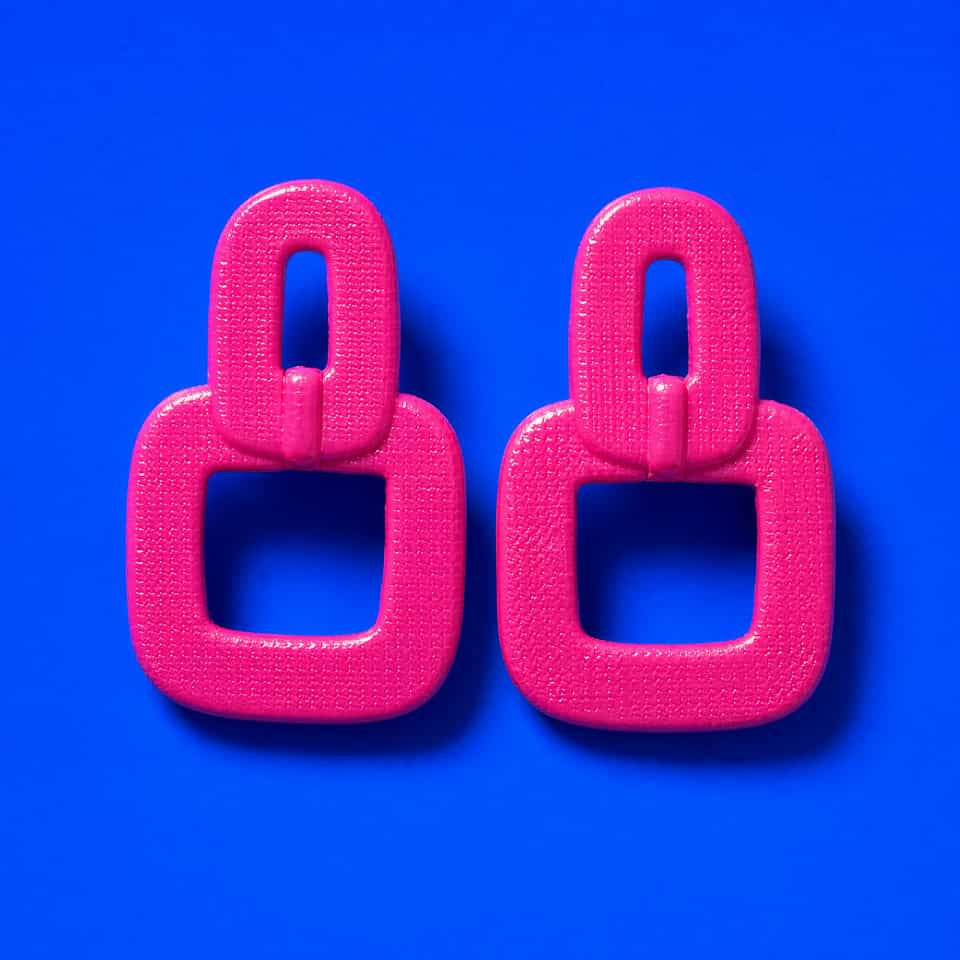
These are a matched pair of flat open-octagon drops: a glittery hot-pink outer ring nested around a pale-yellow inner ring, with the center fully cut out so you see through it, each one hanging from a chunky polished gold huggie hoop on a small gold jump ring. Build both frames from one set of registered octagon cutters so the band widths stay even, bond the two colors with a thin label-directed film of liquid polymer clay, then open the center and clean the corners while the clay is still easy to refine. Pierce the top-center hole on both before baking, cure them flat so the corners do not lift, then add the gold huggie after the frames are fully cool.
A matched pair of flat octagonal drop earrings. Each drop is an open frame: a glittery hot-pink (fuchsia) outer ring around a pale-yellow inner ring, with the center fully cut out. The pink ring sparkles clearly in both photos; the pale-yellow band reads slightly calmer and more satin. Each octagon hangs from a chunky polished gold huggie hoop that wraps the lobe, joined by one small gold jump ring through a hole at the top-center of the octagon. The drop is statement scale, roughly 3 to 4 cm across, and the two frames mirror each other so the pair hangs level.
Two-color nested open-frame slab earrings, cut with registered (concentric) octagon frame cutters. The pink outer ring and pale-yellow inner ring are bonded with liquid polymer clay, the center is cut fully out, and the cured frames hang as dangles from gold huggie hoops on jump rings opened with two pliers. The same nested two-color look can also be reached by cutting through a stacked pink-over-yellow slab, or by building the rings from a single matched concentric cutter set, so the build below gives more than one route to the pattern before the shared finishing and finding steps.
Condition the pink and pale-yellow clay until smooth and pliable, keeping both colors from the same brand at the same firmness so they roll and cut at the same rate. A firm clay like Premo keeps the octagon corners crisp; a lightweight or flexible clay keeps a statement drop comfortable and helps a thin frame flex instead of snapping.
Roll both colors to the same even thickness using thickness guide rails or one locked pasta-machine setting, and re-roll in stages rather than one big squash so the slab stays even. Equal thickness is what lets the two frames sit flush and bake without warping.
Pattern option A (nested cut frames, the cleanest route): lightly dust your concentric octagon cutters with cornstarch, cut the pink outer octagon and punch its center to leave an even pink frame, then cut a yellow octagon that drops inside the pink and punch its center to leave a thin yellow band around a fully open middle.
Pattern option B (stacked slab, cut through): lay a thin yellow slab onto a pink slab and roll them lightly together, then cut the full outer octagon through both layers; trim the yellow back from the outer edge so the pink shows as the outer ring, and cut the open center through both. This gives the two-color frame in fewer separate pieces.
Pattern option C (single matched cutter set): if you have a concentric octagon frame cutter that cuts the outer and inner outline in one press, cut the pink outer frame and the yellow inner frame from that one set so the band widths register identically on every earring, then assemble as in option A.
Make a matched mirrored pair: cut both earrings with the same cutter so they are the same size, cut from adjacent areas of the slab so the glitter reads alike, and flip the second blank if you want a true mirror. Confirm both read as a balanced pair before you go further.
Wipe the raw contact edges of the pink and yellow pieces with a damp swab to clear cornstarch and oils, brush a thin label-directed film of liquid polymer clay on the seam, then press the yellow ring into the pink frame on a flat surface and blend only the seam with a clay shaper so the colors fuse without trapping air.
Pierce the hanging hole at the top-center of each octagon with a needle tool while the clay is raw, keeping a generous wall of clay between the hole and the edge so the loop will not tear out. Set both holes the same distance from the top edge so the finished pair hangs level, since holes cannot be moved after curing.
Bake the frames flat on a smooth ceramic tile lined with cardstock or parchment, following your clay brand's package temperature and time and checking the real oven heat with a thermometer. Let them cool completely on the tile before handling so the corners stay flat.
Once cool, wet-sand the edges through rising grits, keeping the paper wet and the edge moving so you round the corners rather than cut a new flat. Rounded edges feel comfortable against the neck and do not catch hair.
If a baked frame needs a cleaner or wider hole, let it cool fully and open the hole with a pin vise hand drill and a fine bit, then clear any burrs with a bead reamer so the jump ring passes freely.
Open a gold jump ring by twisting the ends sideways past each other with two pliers (never pulling them straight apart), thread it through the pierced hole and the lower loop of the gold huggie hoop, then twist the ends back until they meet flush. Repeat for the second earring and confirm the pair hangs level and front-facing.
Metal findings like posts, hooks, and jump rings may contain nickel or other allergens. If your wearer has sensitive skin, choose surgical steel or titanium findings and test any sealant or coating on a small spot before wearing.
Before you buy, match the sizes and parts to the version you want to make.
The color stock and clay body choices that carry the visible design.
This gets you closer to the sparkly outer ring than a plain pink clay.
Matches the softer yellow inner ring better than a stronger neon yellow.
Useful for bonding raw-on-raw applique, layered details, and small joins without crushing the shape.
A firmer polymer clay ideal for crisp details, pixel grids, and canes to prevent distortion during slicing and assembly.
What you condition with and how you keep the slab even.
Stencils, blades, and cutters for cleaner outlines.
ClayBake makes matched cutter packs sized to this build, so repeated shapes stay consistent. Print or order the set from our tools.
Useful for refining the corners and cleaning the inner opening if the cutter leaves rough spots.
Hole placement, bake surface, and oven check tools.
Helps the open frames cure flat so the corners do not lift.
Useful for checking the real shelf temperature before baking detailed or supported polymer clay pieces.
Useful for tiny marks, seam cleanup, piercing points, and crisp separations before baking.
Posts, jump rings, chain, and connectors that finish the piece.
Adhesives and attachment choices when the build needs them.
Optional surface products if you want to shift sheen, sand, or coat.
Useful for smoothing baked edges, backs, and rims before finishing or attaching hardware.
A lightweight clay with a cohesive suede finish that holds fine textures without sticky residue.
A polymer-clay-compatible glaze option for a glossy finish. Test it on baked scrap before using it on the finished piece.
Each one walks through a technique used in this piece, in full detail.
Custom range
Ask for a build pack to make it yourself (the cutter or tool files, a supply list, and a plan), or ask the studio to make the finished pieces for you.
More pieces with a related form, finish, or making path.
Pin it to a board, copy the link, or keep it saved here while you make your own version.
Tag Clay Bake Studio on Instagram or TikTok so we can see how you adapted it.