Clean cutters
12 3D-printable filesDisc, hex link and triangle drop cutters without hole marks.
- Three disc sizes, five hex sizes and four triangle sizes. A disc also makes a glue-on stud.


3D print the tools. Make it in clay.
3D print the cutters, then make Go-Go linked dangles, studs, pendants, charm chains, magnets or a wall art display.
Digital download: STL files to 3D print, plus a PDF guide. Requires a 3D printer or 3D printing service.

27 3D-printable STL files, an illustrated maker guide and the Maker Licence.
Disc, hex link and triangle drop cutters without hole marks.
The same shapes with pressed marks for hardware positions.


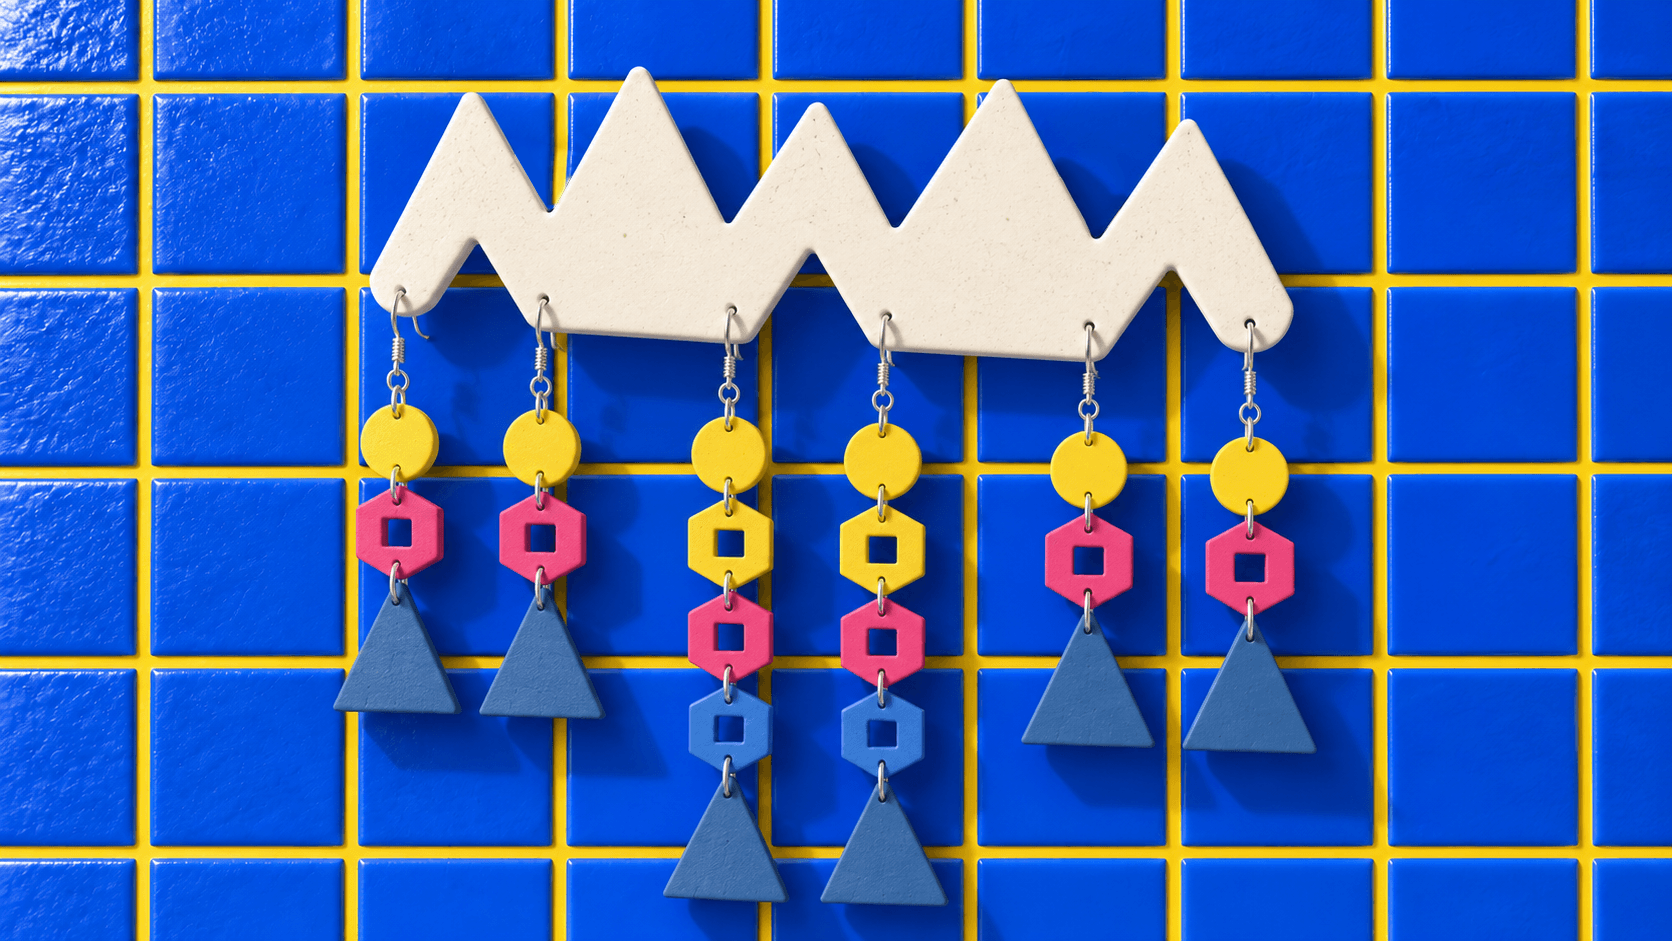
A zigzag wall bar that holds three pairs of earrings.


Disc file sizes are diameters; hex file sizes are heights. Triangle file labels use the nominal height before the tip was rounded, so the cut clay is slightly shorter. The table gives approximate clay outlines at 100% print scale, excluding cutter walls and handles. Triangle dimensions use the measured outline, rounded to one decimal place. Each family outline shows its largest module; every available size is listed beside it.
20 mm at the outlines' scale. Not an actual-size template.
Every size comes in both the clean and the hole-marking set. Choose a combination, then choose how to make the holes. Weights are estimates that include the jump rings, ear wire and a light finish; clay brands vary, so weigh your first earring. To shorten a pair, remove the same number of hex links from both earrings.
| Outline to scale | Module | Clay outline (W x H) | Use it for |
|---|---|---|---|
| Disc | 16 x 16 mm 18 x 18 mm 20 x 20 mm | Top link under the ear wire, or a stud on its own (16 mm) | |
| Hex link | 16.2 x 18 mm 18 x 20 mm 19.8 x 22 mm 21.6 x 24 mm 23.4 x 26 mm | Three middle links | |
| Triangle | 26.8 x 27.3 mm 30.6 x 31.2 mm 34.4 x 35.2 mm 38.3 x 39.1 mm | Bottom drop | |
| Wall bar195 x 65 mm | Wall art display that holds three pairs | ||
Making methods
Cut a disc, three hex links and a triangle for each earring and link them with jump rings. The clean cutters leave the holes to you; the hole-marking cutters press a small dot where each hole goes. The pictured 16/20/32 mm long pair weighs about 7.2 g per earring with findings, over the 5 g comfort guide. Weigh your first completed earring and try it on.

Cut the disc, open hex link and triangle without hole marks. For hanging pieces, mark the positions, then punch before baking or drill after baking and cooling. Leave studs and magnets without holes.
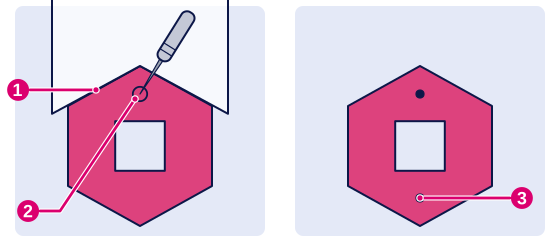
Cut the same three shapes with a small dot pressed at each hole centre. Punch or drill on the dots for hanging pieces. For studs and magnets, use the clean cutters or smooth the dots away before baking.
Your first piece
Print only the files for the piece you are making; the other sizes are there when you want a lighter or bolder pair.
A disc, one hex link and a triangle: about 5.0 g per earring with its findings (an estimate; weigh your own). The easiest way to learn the holes and rings.
See what you needA longer, heavier pair: about 7.2 g per earring with findings. Finish one earring and try it on before you make the second; the size table gives the hanging length.
See what you needHang one column from the chain by its disc, or string single discs, hex links and triangles along it.
See what you needAbout 10.9 g per earring with its findings: heavy for a pierced ear. Choose light findings and a supportive back or a clip-on finding, or wear it as a pendant instead.
See what you needWall art display
Cut one zigzag bar from a single slab to display three pairs of linked dangle earrings through its six holes. Make it in any colours, or roll a speckled terrazzo slab.
See the cutters and helper tools included for each part of the making process.
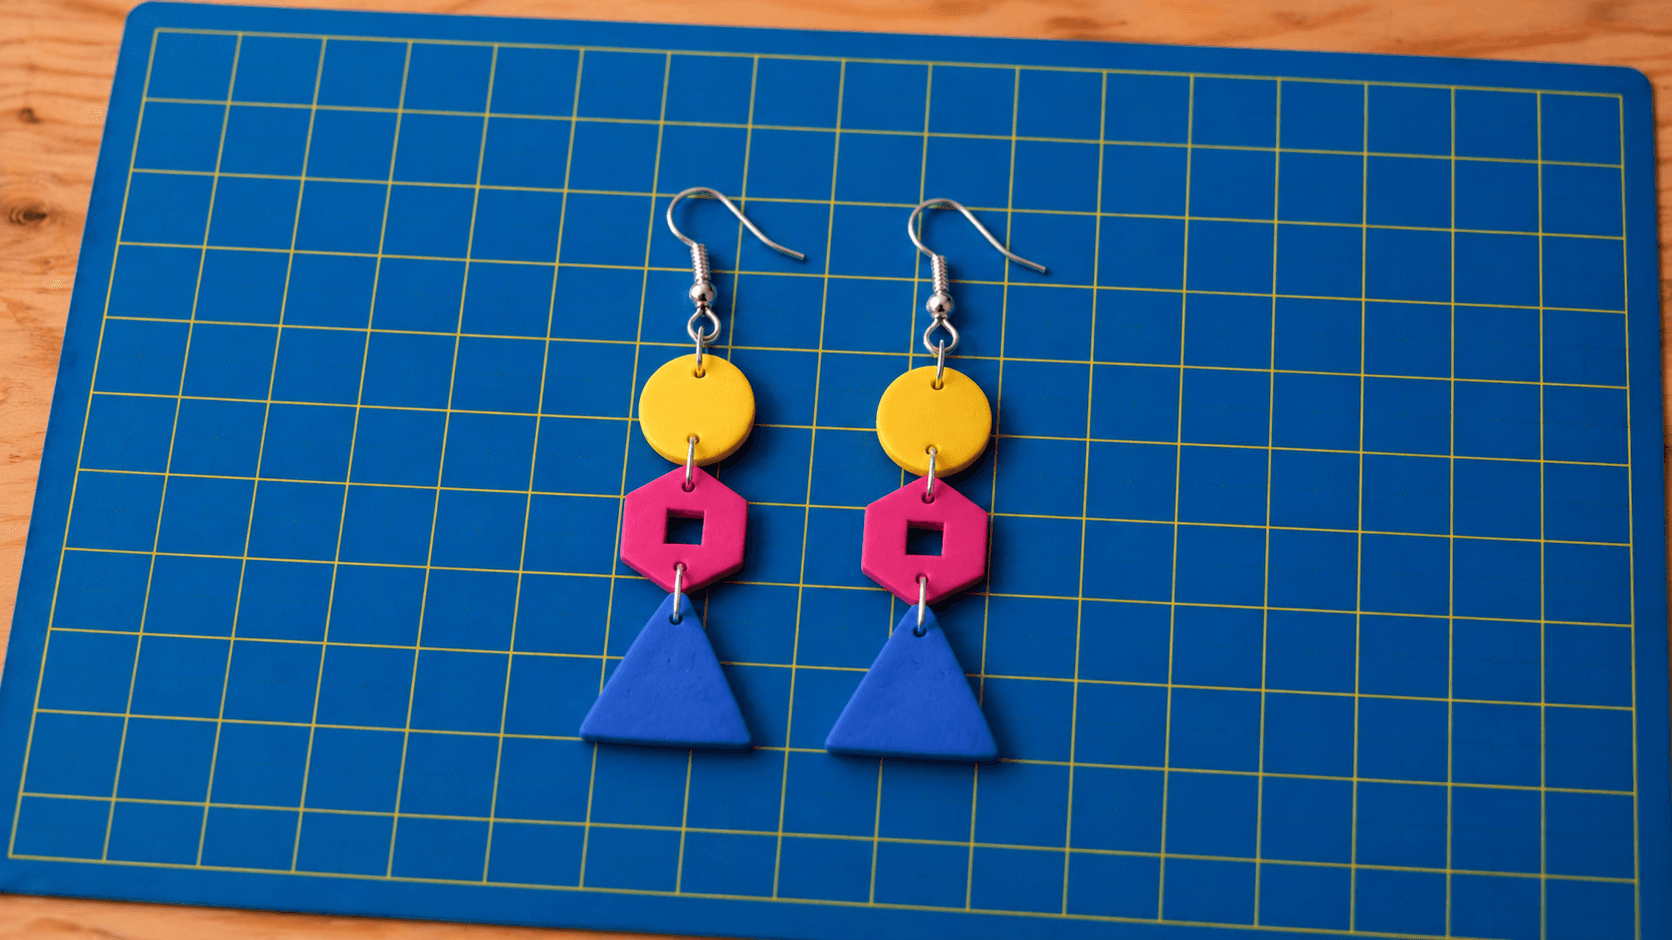
See the disc, square-window hex and triangle cutters cut separate clay slabs, then see the linked long pair and eight finished ideas. The long pair is about 7.2 g each with findings; weigh and try on.
Cut the ten pieces for a pair, make the holes, bake them flat, then link each earring with jump rings. The guide gives the full method, hole positions and ring sizes.

Step 01
Cut two discs, six hex links and two triangles for the long pair, or two of each shape for a short pair. Clear each hex window without stretching the link: push out a centre caught in the cutter, or lift it from the tile with a needle tool.
The 20 mm hex cutter from its cutting face. It cuts the outer hex and square window; the higher handle braces leave no cross in the clay.
Step 02
With the clean cutters, punch each hole in the raw clay where the guide shows, or drill after baking. The hole-marking cutters press a small dot at every hole, so you punch or drill right on the dot.
A disc from above. Its two holes go on the centreline, one near the top and one near the bottom.Help with this step

Step 03
Keep the modules flat on the oven-safe tile you cut them on, so raw clay needs less handling. Return any released hex links to the tile. Follow your clay packet directions and cool completely before drilling or adding findings.
The triangle drop after cutting. Keep the links flat when moving them to the baking surface.Help with this step

Step 04
Link disc, three hex links and triangle for the long pair, or disc, one hex and triangle for a short pair. Finish one earring, weigh it and try it on, then copy the size, colour and ring order for its partner. Check both hang the same length and swing freely.
The finished link order.Help with this step
What you will need
Use the tools you already own. Choose your piece to see its findings, then check the shared materials below. Some linked hardware packs contain enough for many pieces.
Links marked "Affiliate link" may earn us a commission at no extra cost to you. Check sizes and materials before checkout.
What are you making?
The shorter dangle and the long pair use the same findings; the long pair needs more rings.
Ear hooks and silicone backs for the linked pair. Compare any included rings with the guide before buying; each join needs its own ring size.
Use the ring specified for each join in the guide: round rings at the top and between links, and an oval into the triangle. Each long earring needs five rings; a short dangle needs three. A single ring pack may not cover every join. The linked 10 mm round-ring pack is a larger option; compare its inside size and wire with your chosen join in the guide.
The triangle join uses an oval ring. Buy these separately if the round-ring pack does not include them; match the size and wire thickness in the guide.
If the piece hangs sideways, add the small second ring specified in the guide between the top ring and the ear wire or post loop, so the front faces forwards.
Two pairs open and close jump rings without scratching them. The linked pliers set also includes starter findings; compare their sizes with the guide.
The column hangs from the loop under a ball post, so it swings just below the lobe.
A ball post with a small loop below it. The top jump ring joins the loop to the disc. Pick a finding material that suits your ears.
The statement pair is heavy, about 10.9 g an earring. A back with a flat disc rests behind the lobe and helps it hang straight.
Use the ring specified for each join in the guide: round rings at the top and between links, and an oval into the triangle. Each long earring needs five rings; a short dangle needs three. A single ring pack may not cover every join. The linked 10 mm round-ring pack is a larger option; compare its inside size and wire with your chosen join in the guide.
The triangle join uses an oval ring. Buy these separately if the round-ring pack does not include them; match the size and wire thickness in the guide.
Two pairs open and close jump rings without scratching them. The linked pliers set also includes starter findings; compare their sizes with the guide.
Plus glue from the core kit below.
Glue one flat-pad post to the bare back of each baked, cooled disc. Leave it without holes and match the post pad to the guide before buying.
A whole linked column hangs from the chain by its disc.
Ready-made chains with clasps, so the piece is finished as soon as it hangs.
The top ring joins the disc to the chain; the links use the same rings as the earrings. Check each required ring size against the guide before buying. The linked 10 mm round-ring pack is a larger option; compare its inside size and wire with your chosen join in the guide.
The triangle join uses an oval ring. Buy these separately if the round-ring pack does not include them; match the size and wire thickness in the guide.
Two pairs open and close jump rings without scratching them. The linked pliers set also includes starter findings; compare their sizes with the guide.
Single discs, hex links or triangles, each on its own ring along one chain.
Ready-made chains with clasps, so the piece is finished as soon as it hangs.
One ring per charm. Match the ring to the shape using the guide; the triangle needs an oval ring. The linked 10 mm round-ring pack is a larger option; compare its inside size and wire with your chosen join in the guide.
The triangle join uses an oval ring. Buy these separately if the round-ring pack does not include them; match the size and wire thickness in the guide.
Two pairs open and close jump rings without scratching them. The linked pliers set also includes starter findings; compare their sizes with the guide.
Plus glue from the core kit below.
Glue one to the flat, bare back of a disc or triangle after baking and cooling. The specified magnet does not fit beside the hex link's window. Never bake a magnet.
Keep loose and finished magnets away from young children and pets; a swallowed magnet can cause serious internal injury, so get medical help straight away. Keep magnets away from pacemakers. Selling magnets? Check the magnet safety rules where you sell.
The pairs you hang on it use the drop earring supplies.
Two small nails or screws carry the bar through its two printed hangers. Each needs a flat head of about 8 mm; the guide gives the head, shank and gap that fit.
Follow the tape label for the wall surface, preparation, pressure and waiting time. This projecting assembly has no established tape load rating.
Glues the two printed hangers to the back of the baked, cooled bar. Keep it out of the slots and let it cure fully.
Most makers already own some of these; the rest is your shopping list.
Three colours for the disc and links (shown: yellow, pink and blue), or one colour for the whole chain.
Rolls even slabs between thickness guides.
Set each slab to the height the guide gives, and check it with calipers. Our thickness guides are a separate download.
Lifts thin cut shapes off the surface without stretching them.
A smooth surface to roll and cut on.
Drills the holes after baking and full cooling, with the back supported, if you do not punch them raw.
Supports the pieces while they bake flat.
Checks the real oven temperature against your clay packet.
Smooths the edges and back of the baked piece, from 400 grit up.
Glue stud posts, magnets or the wall bar hangers to baked, cooled clay. Jump rings through holes do not need glue. Follow the adhesive label and let it fully cure.
For dry sanding and drilling baked clay.
For drilling and sanding.
Conditions clay and rolls even slabs far faster than a hand roller. Keep it for clay only.
Drills hanging holes and sands edges quickly across a batch of baked pieces.
Only if you want shine. Test it on baked scrap first.
Print the card and cutter files to present and sell your earrings.
Print a stand to show your pairs at markets and in product photos.
Prints the cutter files. If buying, compare models for your budget and workspace, and ventilate while printing.
The guide gives the nozzle, layer and support settings. Match the filament diameter to your printer.
Make it your own
See how each piece is finished, then shop only what it needs. The guide covers the sizes and ring steps; clay and hardware are not included.

Use the disc, one hex link and the triangle for a lighter pair.
See what you need
The pictured Go-Go long pair on ear wires: a disc, three open hex links and a triangle drop. About 7.2 g per earring with findings, over the 5 g comfort guide; weigh your pair and try it on.
See what you need
Glue a flat-pad post to the bare back of a baked, cooled disc. No holes needed; the size table identifies the recommended disc.
See what you need
Build one column and hang it from a chain by the disc.
See what you need
Hang single discs, hex links or triangles from a chain with one jump ring each.
See what you need
Glue a magnet to the flat back of a single shape for a bright fridge decoration.
See what you need
Show your pairs on printed earring display cards or a printed stand at a market stall or in product photos.
See the display card kit
A pair of shorter Go-Go dangles hanging from a cream Softwave T-bar display.
See the display stand kit
A matching Go-Go pair with a yellow disc, pink hex link and blue triangle, hanging from ball posts.

Yellow Go-Go studs and shorter dangles arranged on a pink backing card.

Colourway
Keep the link order and change the palette: one colour for the whole chain, a gradient from disc to drop, or marbled or patterned slabs.

Colourway
Keep the link order and change the palette: one colour for the whole chain, a gradient from disc to drop, or marbled or patterned slabs.
Use the statement combination in the size table for a bold pair. It is heavy, about 10.9 g per earring, so choose light findings with a supportive back and try it on first.
Cut the zigzag wall bar for wall art that holds three pairs of earrings.
See the wall art displayYou may sell the finished polymer clay pieces you make. You may not sell, share or redistribute the digital files or 3D-printed tools. See the included Maker Licence for the full terms.
If a file is missing, won't open or doesn't match the listing, message us through Etsy messages with the build kit name and filename, and we'll put it right.
Message us on Etsy