tutorials7 min read
Polymer Clay Cane: A Small Recorded Pattern Exercise
Use a simple patterned-log exercise to test one clay, arrangement, cut face, and package-directed bake without turning it into a universal cane method.
Open the guide

Lookbook view
Styled context
Treat this as a starting point for inspiration and experimentation. The concept and reference imagery here is AI-assisted, and AI helped organize the maker notes. Clay brands, ovens, glues, finishes, and hardware behave differently, so check product instructions and test on scrap before making a batch. Measurements, spacing, and timing are estimates from the reference images. Test them on scrap before making a batch. Some product links on this page are affiliate links. If you buy through them, we may earn a commission at no extra cost to you. Check listing details, dimensions, materials, and fit before you buy. As an Amazon Associate I earn from qualifying purchases. Full disclosures
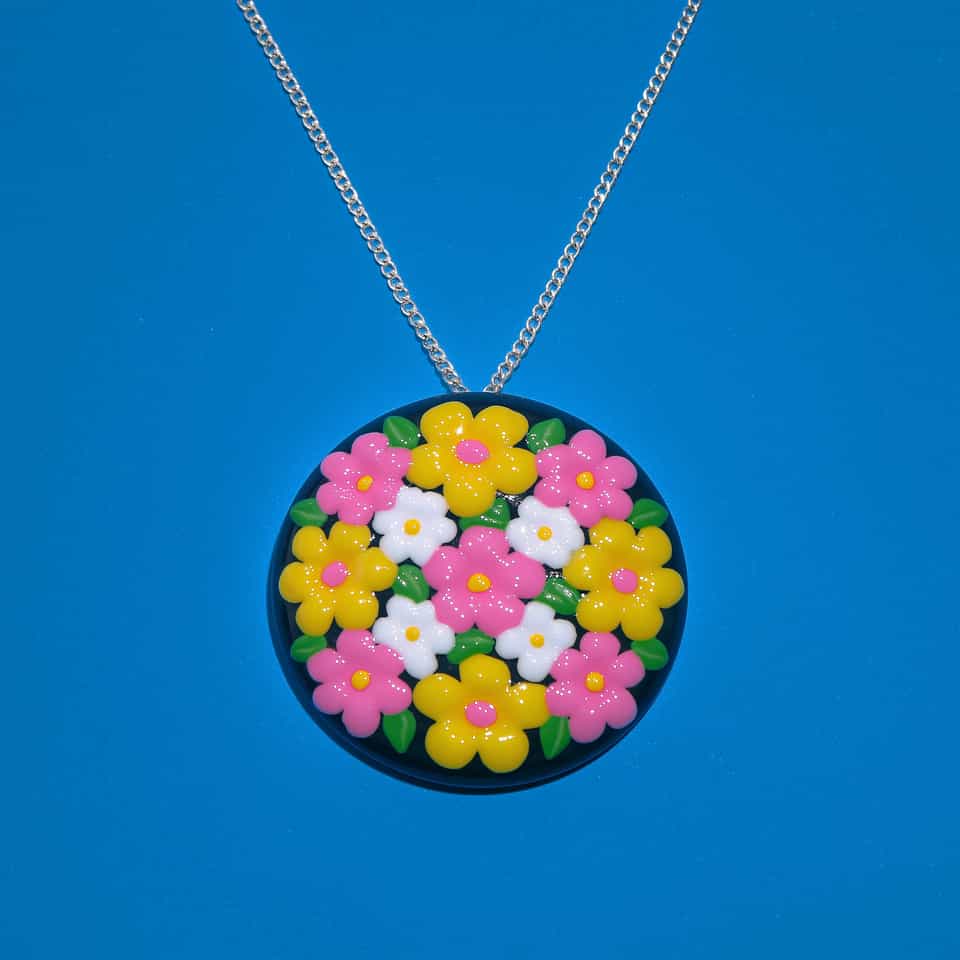
This is a small, gently domed round collar brooch packed edge to edge with tiny pink and white five-petal flowers, each with a sunny yellow center, sitting flush on a near-black navy ground with a few chartreuse filler dots. The face is true millefiori: thin slices off a reduced flower cane, pressed and rolled into one flush surface, then sanded and glossed so the petals read crisp. You can also get the look from a cut-and-applied flower slab or by hand-laying tiny raised flowers. Whichever route you pick, build an even blank, bake it flat so it does not warp, and add the pin back after the clay cools.
A small round disc, lightly domed and high-gloss, covered corner to corner with miniature five-petal flowers in bright pink and clean white, every flower centered with a yellow dot. The flowers sit flush on a dark navy ground, with a scatter of small chartreuse green dots filling the gaps. In wear it pins flat at a shirt collar and reads as a tidy round collar brooch about 25 to 30 mm across.
Flush millefiori on a dark ground is the primary method: build and reduce a pink five-petal flower cane and a white one, both around a yellow center, slice thin, lay the slices edge to edge on a dark navy blank, and roll them into one flush plane before cutting the disc. Two alternates reach a similar face: a cut-and-applied flower slab (build a flower loaf, slice, and roll the slices flush into the base) or hand-laid raised relief (cut tiny petals and centers and apply them with a thin liquid-clay film). After cure, wet-sand the front through progressive grits and add a thin gloss so the petals stay crisp.
Condition pink, white, yellow, chartreuse green, and dark navy clay until smooth. A firmer clay keeps the petal edges crisp through reduction and slicing.
Pattern option A (millefiori cane, the look in the photo): Build a pink five-petal flower cane and a white five-petal flower cane, each wrapped around a yellow center. Cap both ends of each cane, make a waist, and reduce in a barbell shape so the design holds, until each flower is about 6 to 8 mm across. Let the canes rest, then slice thin even rounds with a clean tissue blade, turning the cane a quarter turn between cuts.
Pattern option B (cut-and-applied flower slab): Build the flowers as a stacked loaf instead of a round cane, slice thin cross-sections, and treat them like the cane slices in the next step. This trades the round-flower read for a slightly more graphic, blocky flower.
Pattern option C (hand-laid raised relief): Skip the cane. Cut tiny petals and yellow centers from thin clay, brush a seriously thin film of liquid polymer clay onto the blank, press each piece down, and blend only the foot so the flowers stand slightly proud. This reads dimensional rather than flush.
Build the blank: roll a dark navy slab to one even thickness using guide strips so the disc bakes flat. Wipe the raw surface with a damp swab to clear dust before applying the pattern.
For options A and B, lay the flower slices edge to edge across the blank and tuck small chartreuse green dots into the gaps, matching the scatter in the photo. Smooth from the center outward to push out trapped air.
For options A and B, roll the whole patterned slab gently (butting one edge against the pasta machine wall and swapping sides) so the slices fuse into one flush surface. For option C, leave the relief proud.
Choose your pin route now. Glue route: bake the disc plain on the back, attach the pin after cooling (later steps). Embed route: texture and slightly kink the pin pad, brush liquid clay over the seat, press it into the raw back above the horizontal center line, cap it with a thin clay layer, and seal the seam.
Bake flat: rest the disc on a ceramic tile lined with parchment or plain cardstock so the back stays matte, and tent loose foil over it to even the heat. For an embedded pin, nest the piece so nothing presses the back flat against the finding. Cure at your clay brand's package temperature and time, using an oven thermometer to confirm the real oven temperature. Bake the full time so the back holds the pin.
Let the piece cool completely on the flat tile before handling, since warm clay sets its shape as it cools.
Wet-sand the front through 400, 600, 1000, and 2000 grit with water to level any high slices and bring the millefiori up crisp. For option C relief, sand lightly so you do not flatten the raised flowers.
Finish to the photo: buff to a satin sheen, or brush one thin coat of a water-based gloss glaze, tested first on baked scrap. A water-based finish keeps the cane edges crisp; solvent or aerosol coats can stay tacky over time.
Glue route only: lightly score the glue seat on the cooled back and the metal pad, wipe both with isopropyl alcohol to remove oils, then bond a bar pin set above the horizontal center line with two-part epoxy or E6000. Let it cure fully and undisturbed before wearing.
Before you buy, match the sizes and parts to the version you want to make.
The color stock and clay body choices that carry the visible design.
Useful for the white petals and for lightening any custom flower colors without muddying them.
Matches the bright pink flower petals in the brooch face.
Useful for the flower centers and for warming the palette without losing brightness.
A firmer polymer clay ideal for crisp details, pixel grids, and canes to prevent distortion during slicing and assembly.
What you condition with and how you keep the slab even.
Makes it much easier to build even sheets and reduce a flower cane without distorting the pattern.
Useful if you want more control when flattening the backing disc or compressing cane slices by hand.
Roll every sheet to the same calibrated thickness with the ClayBake slab height guides.
Stencils, blades, and cutters for cleaner outlines.
Bake surface and oven check tools for the finished brooch.
Adhesives and attachment choices when the build needs them.
Optional surface products if you want to shift sheen, sand, or coat.
Needed to turn the finished disc into a collar brooch after the clay has cooled.
Optional gloss finish to test on baked scrap when the reference needs brighter shine.
Useful for smoothing baked edges, backs, and rims before finishing or attaching hardware.
A lightweight clay with a cohesive suede finish that holds fine textures without sticky residue.
A polymer-clay-compatible glaze option for a glossy finish. Test it on baked scrap before using it on the finished piece.
Each one walks through a technique used in this piece, in full detail.
Use a simple patterned-log exercise to test one clay, arrangement, cut face, and package-directed bake without turning it into a universal cane method.

Your slab cracked at the edge, your cutter dragged, or one color distorted more than the rest. Condition until every color folds the same way, then do the fold test before you cut.
Custom range
Ask for a build pack to make it yourself (the cutter or tool files, a supply list, and a plan), or ask the studio to make the finished pieces for you.
More pieces with a related form, finish, or making path.
Pin it to a board, copy the link, or keep it saved here while you make your own version.
Tag Clay Bake Studio on Instagram or TikTok so we can see how you adapted it.