How to Resin Dome Polymer Clay: UV vs Epoxy Tutorial
A clean resin dome on polymer clay needs a sealed surface, controlled drop volume, and the right cure window. This guide covers nitrile gloves, hole-tape workflow, UV lamp timing, and two-part epoxy as the slower alternative.
In brief
Key takeaways
- 1Cure and cool the polymer clay piece fully before any resin work since warm or under-cured clay can fog or warp the dome
- 2Mask earring or sew-through holes with low-tack tape from the back so resin does not seep into them during the pour
- 3Wear nitrile gloves and work with airflow since uncured resin can cause sensitization with repeated unprotected handling
- 4Choose UV resin for fast cures under a 405 nm lamp or two-part epoxy for a slower self-leveling glassy dome that needs 24 to 72 hours
A resin dome on polymer clay can lift a simple slab into something that looks finished and gallery-ready, but only when the surface is sealed properly, the drop volume is controlled, and the cure window matches the resin type. The most common failures come from cloudy spots under the dome, bubbles trapped during the pour, holes filled in by resin runoff, and tacky surfaces that never finish curing. Each of those is preventable once the workflow is set.
Two resin systems dominate polymer clay doming. UV resin cures fast under a 405 nm lamp and is convenient for small batches and one-off pieces. Two-part epoxy self-levels and produces a thicker, glassier dome but takes 24 to 72 hours to fully harden. Both have a place. The right choice depends on your batch size, your timeline, and whether you have a UV lamp set up.
Maker reference only. Verify brand instructions, seller details, dimensions, and safety guidance for your own setup.
Cure The Polymer Clay Piece Fully First
Resin goes on after the polymer clay is fully baked and cooled. Do not apply resin to under-cured clay.
Bake the clay piece per your line's package directions. Verify oven temperature with a separate thermometer; many home ovens run hot or cold. Sculpey Premo cures at around 130 C for 30 minutes per 6 mm of thickness. FIMO Soft and Cernit have their own profiles, so always follow the printed directions for your specific line.
Let the piece cool fully on the tile after baking. Resin applied to warm clay can develop weird surface tension issues and uneven spread. Plan to do the resin step in a separate session from the bake, ideally after at least an hour of cooling and inspection.
If you plan to sand the clay surface for smoothness, do it before resin. Sand with 400, 600, then 800 grit wet sandpaper, rinse, and let the piece dry fully before any resin work. Wet clay can fog the resin from underneath.
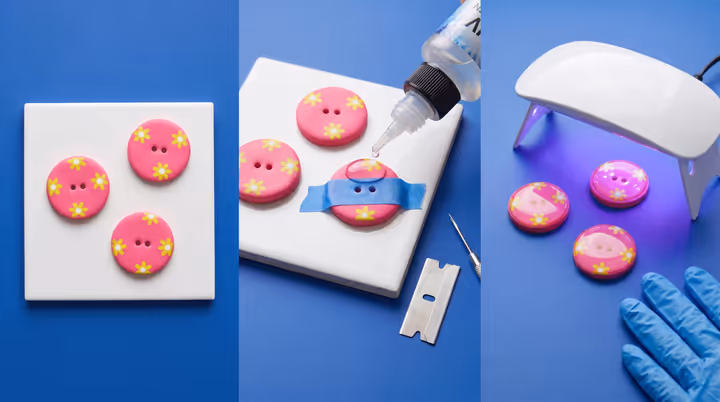
Mask Any Holes With Low-Tack Tape
If the piece has earring holes, sew-through holes, or jump ring openings, mask them before resin or the resin will fill them in.
Apply small pieces of low-tack masking tape (washi tape or painters tape) over the holes from the back. Press the tape firmly so resin cannot seep underneath. For two-hole buttons, mask both holes from the back side of the piece so the front face stays clean.
The tape comes off easily after the resin cures. If any small drip of resin worked its way under the tape, a needle tool or a small drill bit can clear the hole after cure. Plan for a quick cleanup pass once the dome is fully set.
Wear Nitrile Gloves And Work In A Ventilated Space
Resin is a chemical product. Wear nitrile gloves and work in a space with airflow.
Skin contact with uncured resin can cause sensitization over time. Some people develop allergic reactions after repeated unprotected handling. Nitrile gloves are the standard barrier for resin work; latex gloves can break down under contact with some resins.
Open a window, run a fan, or work in a ventilated craft space. UV resin has a lower odor than epoxy but still has fumes during cure. Two-part epoxy has a stronger smell during the mixing and pour stage.
Cover the work surface with a silicone craft mat or wax paper. Cured resin drips peel off silicone easily. Cured drips on a wood table or fabric do not come off.
UV Resin Workflow: Drop, Spread, Cure In Passes
Drop UV resin in small amounts, spread with a toothpick, and cure in 2 to 4 minute passes under a 405 nm lamp.
Hold the UV resin bottle close to the piece and dispense a small drop in the center of the surface to be domed. The resin will start to spread on its own due to surface tension. Use a clean toothpick to guide the resin to the edges if needed.
Aim for the dome shape you want before curing. UV resin cures fast and stops moving the moment the lamp turns on, so any unevenness in the drop will be locked in. For small pieces like buttons or studs, one drop is often enough; for larger drops or pendants, work the resin out from the center until it nearly reaches the edge.
Place the piece under the 405 nm UV lamp. A 36 W or higher lamp at the right wavelength typically cures hard-type UV resin in 2 to 4 minutes per pass. Lower power lamps or wrong wavelength can leave the dome tacky. Check your resin's printed cure time; some brands need 60 seconds, others need 5 minutes.
For a thicker dome, cure the first pass, then add a second drop on top and cure again. Stacking thin layers gives more control than trying to lay one giant drop. Each pass adds about 1 to 2 mm of height.
Manage Bubbles Right After The Pour
Bubbles rise to the surface in the first minute or two. Use heat to release them before curing.
After dropping the resin, look closely for trapped bubbles. A small craft heat tool, a heat gun on low, or the side flame of a butane lighter held briefly across the surface releases most bubbles. Move the heat source quickly; lingering in one spot can scorch the resin or burn the clay underneath.
Pop any stubborn bubbles with a sharp toothpick. Then cure under the UV lamp.
If bubbles still show up after cure, the next batch usually fixes them by mixing or stirring more slowly, dropping from a lower height, and giving the resin a longer settle time before the lamp goes on.
Two-Part Epoxy: The Slower, Self-Leveling Alternative
Two-part epoxy mixes a base with a hardener and cures in 24 to 72 hours at room temperature. The trade-off is patience for a glassier finish.
Mix the two parts at the ratio printed on the bottles, usually 1:1 by volume. Stir slowly with a craft stick for 2 to 3 minutes, scraping the sides and bottom of the mixing cup so everything blends fully. Under-mixed epoxy never cures completely.
Let the mixed resin sit for 5 to 10 minutes before pouring. Most of the air bubbles whipped in during stirring will rise to the surface. Some makers pop bubbles with a heat tool at this stage too.
Pour the resin onto the cured polymer clay piece. Epoxy self-levels, so it will spread to the edges on its own. Use a toothpick to nudge it if needed. Cover the piece with a dust cover (a cardboard box turned upside down works) and leave it undisturbed for the cure window printed on your epoxy.
Most jewelry-grade epoxies are touch-dry in 8 to 12 hours and fully cured in 24 to 72 hours. Do not wear or stress the piece before full cure. Premature handling leaves fingerprint dimples in the dome that cannot be fixed without re-pouring.
Remove The Tape, Clear The Holes, Inspect
After full cure, peel off the masking tape and inspect for missed spots.
Lift the tape from the back of the piece slowly. The cured resin should pull cleanly from the tape edge. If any resin seeped under the tape and partly filled a hole, clear it with a needle tool or a small drill bit run through the hole.
Check the dome surface under raking light. Small bubbles or surface defects on UV resin can sometimes be sanded smooth and topped with a thin re-cure layer. Epoxy defects are harder to repair without re-pouring.
Use This Guide With The Lookbook
If an item page mentions a resin dome, glassy finish, or domed bakelite-style buttons, use this guide as the build logic behind the technique.
It is most useful for:
- resin-domed flower and floral-relief buttons
- UV-domed earring drops and pendants
- glossy-finish brooches where the dome is part of the design
For the swirl pattern that often sits under a resin dome on vintage-style buttons, see the faux bakelite swirl guide.
Take the next step
Continue the series with the next guide in this path.