In brief
Key takeaways
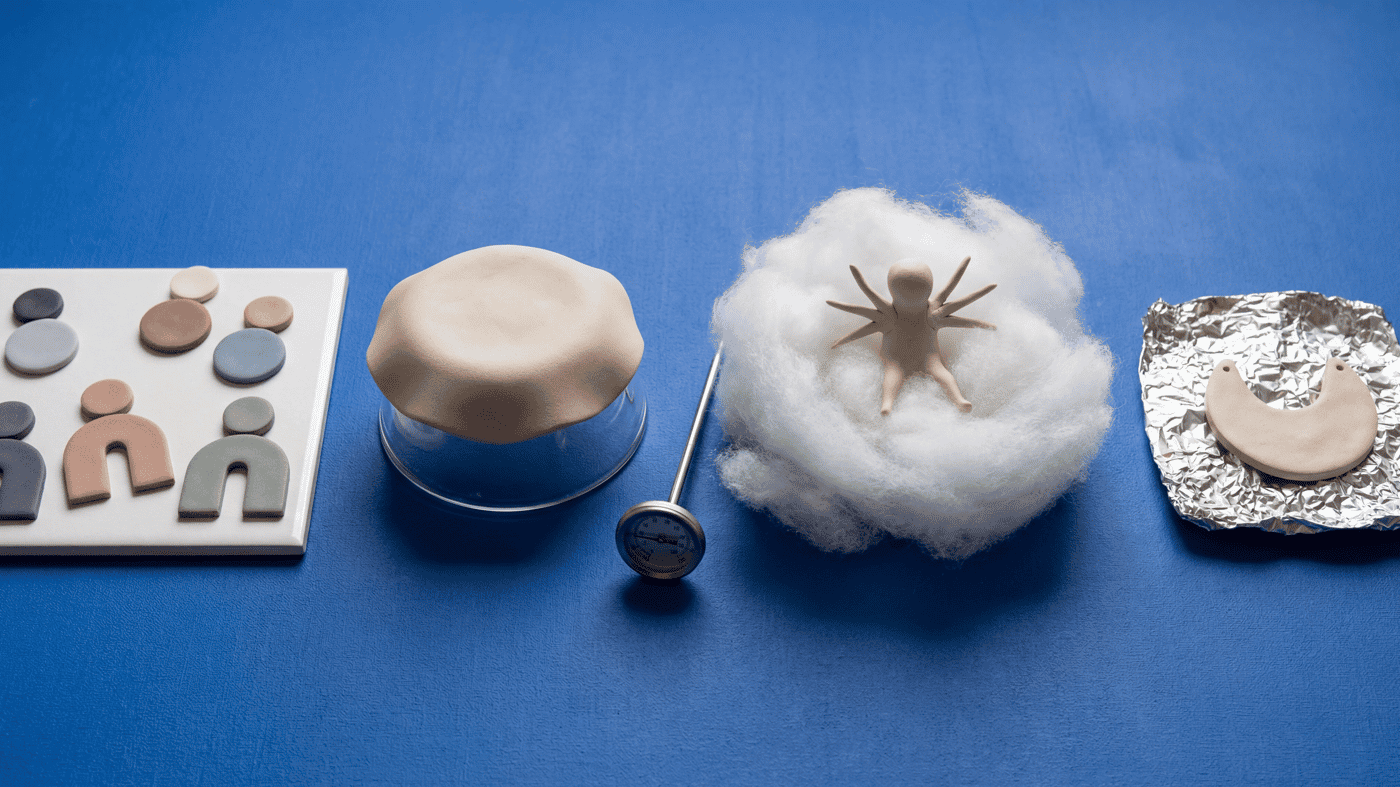
- 1Start with a stem 8 to 15 mm wide and 15 to 25 mm tall, pressed flat at the base so the foot spreads wider than the body and the figure cannot tip
- 2Roll the cap as a partial dome 15 to 30 mm wide for studs or 40 to 80 mm for figurines, then press a shallow hollow into the underside so it seats over the stem
- 3Press white spots into the cap with steady even pressure so they bond into the surface, vary the sizes for a natural read, and skip the cap-rim underside
- 4Tuck a foil ring or fiberfill nest under any overhanging cap during bake, follow the package directions for the exact clay line, and verify tray-height heat with a thermometer
- 5Wait until the figure is cool to the touch before lifting from the tile, then inspect for rim cracks, join seams, and lifted spots before any sealing or hardware
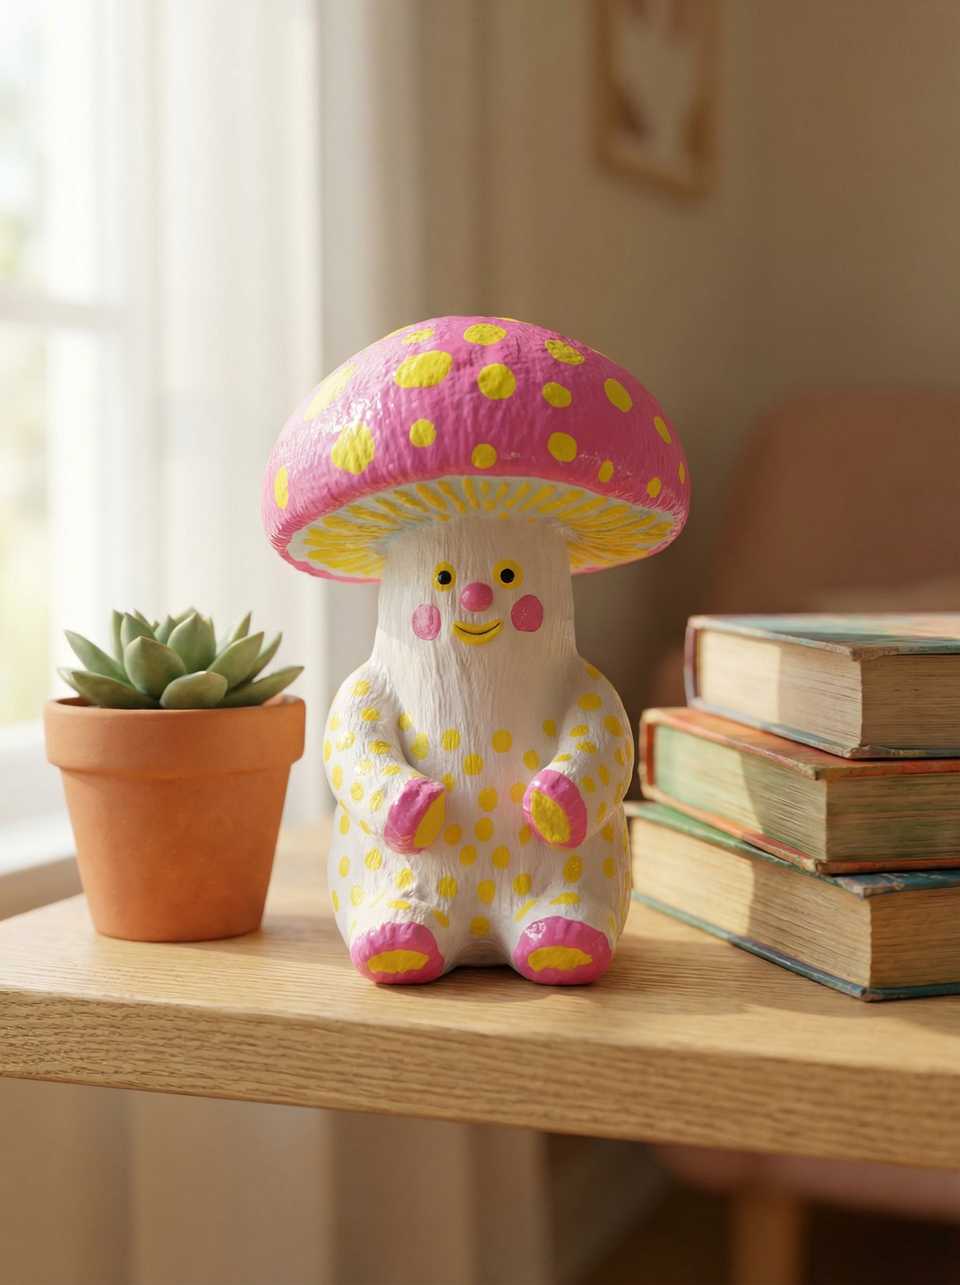
A red-cap mushroom with white spots is one of the friendliest first sculpting projects in polymer clay. The cap is forgiving, the stem is short, and there is almost no armature problem to solve. You can build a complete mushroom in under an hour, bake it on a tile, and have a finished figurine, stud topper, or brooch ready for hardware the same evening.
This tutorial walks through the build in seven steps, from conditioning to finish, with the most common beginner failures called out at the end. The same logic can scale from a tiny stud topper to a larger tabletop figure when the stem and support scale with the cap.
What You'll Need
A first mushroom needs two colors of polymer clay, a tile, and your hands. Everything else is optional.
- One or two colors of polymer clay for the cap. A classic red, a cobalt blue, or a soft cream all read as mushroom. Pick one cap color and one stem color. Sculpey Premo and FIMO Soft are both common starts.
- A small amount of white polymer clay for spots. Premo White or any cane-friendly line will hold a clean dot.
- A ceramic tile for rolling and baking. A clay-dedicated 6x6 inch ceramic tile moves from work surface to oven without disturbing the piece.
- An oven thermometer. Verify tray-height heat with an oven thermometer before relying on the dial. The oven thermometer guide covers placement.
- Optional tools. A ball stylus for hollowing the cap underside, a needle tool for gill lines, and a small amount of crumpled aluminium foil if you plan a hollow-cored cap on a larger figurine.
- Optional finish. A water-based matte sealer or a clear soft wax once the piece is baked and cooled. The sealer guide covers what pairs with which clay line.
For the conditioning step that comes before any of this, see the conditioning polymer clay guide. Light conditioning is the single biggest reason a first mushroom cracks at the cap rim.
Step 1: Condition the Clay
Warm each color in your hands until a folded slab bends without cracking on the outside curve.
Roll the cap color into a ball and squeeze it between your palms for a minute or two. Do the same with the stem color. Test by folding a small pinch in half: if the outside of the fold cracks, keep conditioning. If it folds smooth, the clay is ready.
Match softness across the two colors. If one color is noticeably softer than the other, the cap and stem will behave differently when you press them together, and the join will read as a visible seam after cure.
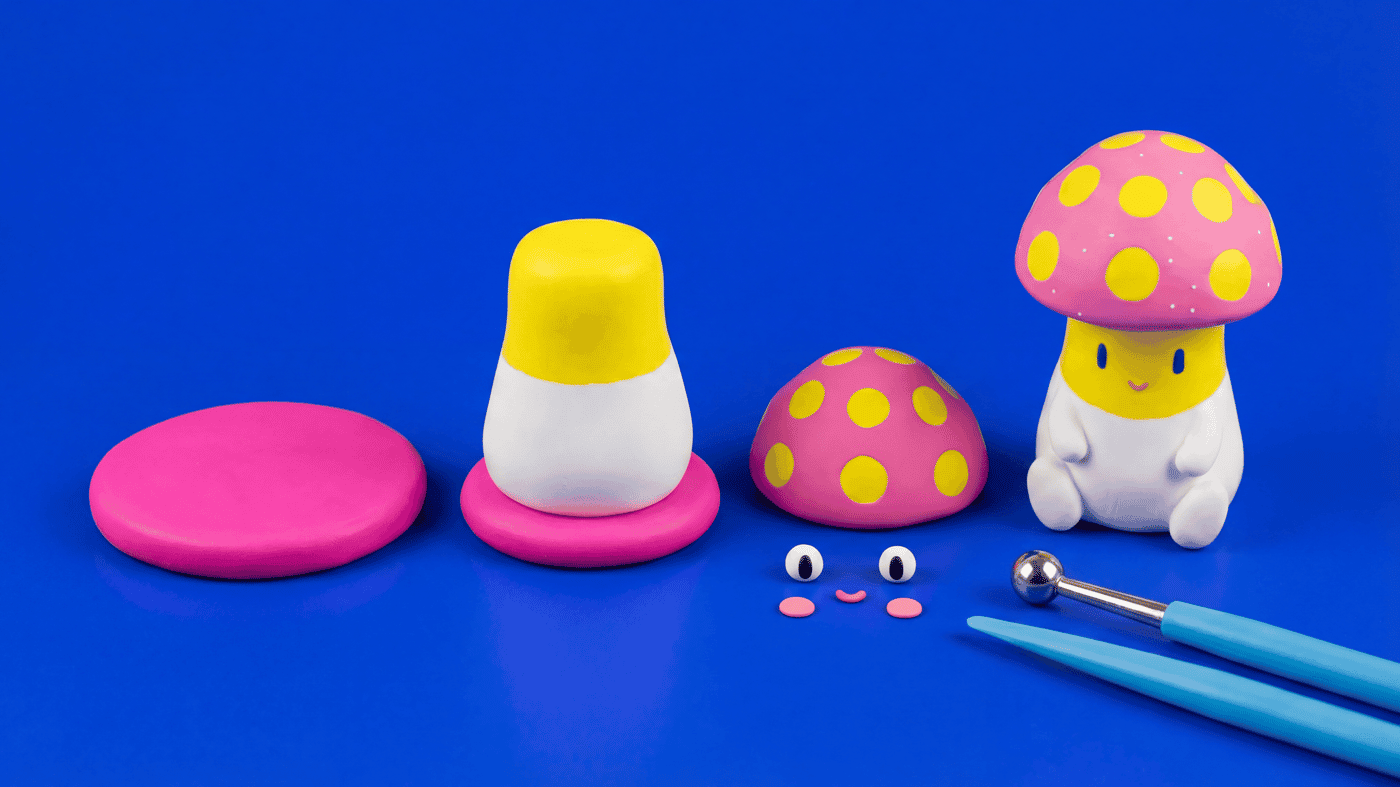
Step 2: Shape the Stem
Roll a short, slightly tapered cylinder and stand it on the tile. The base needs to be broad enough that the cap weight cannot tip the piece over.
Roll a small log of stem-color clay and stand it upright on the tile. Press the bottom flat against the tile so the base spreads a little wider than the rest of the stem. That widened foot is what keeps the figure stable while the cap goes on.
For a figurine-scale piece, widen the stem base and add a slight inward taper toward the top. The cap then has a defined shoulder to seat against. For a stud-topper-scale piece, keep the stem shorter so the finished piece sits close to the ear.
Step 3: Shape the Cap
Pick a silhouette, roll a ball, flatten partially into a dome, and lightly hollow the underside with a thumb so the cap can sit over the stem.
The most common cap silhouette is a low dome, roughly half a sphere. A taller bell-shaped cap reads as a more stylised mushroom. A flat cap reads as a button mushroom and is best left for advanced builds because the underside detail does most of the visual work.
Roll a ball of cap-color clay. For studs, keep the cap low and light. For figurines, scale the cap up only when the stem base and bake support scale with it. Flatten the ball partially with your palm so it forms a low dome, then press your thumb gently into the underside to hollow a shallow socket. That socket is what lets the cap seat cleanly over the top of the stem.
For larger caps, consider a foil core. Crumple a small ball of aluminium foil to roughly half the cap diameter, then mould the cap clay around it. The foil keeps the figure light, reduces internal stress during cure, and lets you build a wider cap without piling on solid clay.
Step 4: Attach the Cap to the Stem
Lower the cap onto the stem, seat the hollow over the stem top, and smooth the join from underneath so the seam disappears.
Position the cap above the stem with the hollow facing down. Lower it onto the stem and press gently until the hollow seats over the top of the stem. The cap should sit at a slight downward angle from the stem axis, the way a real mushroom cap shoulders out from the stem.
Smooth the join from underneath with a fingertip or a small ball stylus. Work the cap-color clay outward over the rim of the stem so the seam vanishes. If the join still reads as a visible line, add a tiny ring of stem-color clay at the underside join and smooth that into both surfaces.
Step back and check the figure from eye level. The cap should sit centred on the stem with a clean shoulder line, and the whole piece should stand upright on the tile without leaning. If it leans, the stem base is not broad enough; lift the figure, widen the base, and re-attach.
Step 5: Add Spots and Details
Roll small balls of white clay, flatten slightly, and press into the cap surface with even pressure. Vary the sizes so the spots read as natural rather than stamped.
Pinch off small balls of white clay, using smaller dots on stud-scale caps and larger dots on figurines. Flatten each ball lightly between your fingertips into a low disc. Press each disc onto the cap with steady, even pressure so the white clay bonds into the cap surface rather than just sitting on top.
Mix two or three sizes of spot for a more natural read. Scatter the spots a little unevenly; a slightly asymmetric layout reads more like a real mushroom than a tidy grid. Skip the underside of the cap rim, where spots tend to look unfinished after cure.
For optional gill detail on the underside of the cap, score thin radial lines from the stem outward with a needle tool. The lines should be shallow enough that they read as texture rather than as cut grooves. Keep the underside detail subtle on a stud topper because it will not be visible in wear.
Step 6: Support and Bake
Stand the mushroom upright on the tile. For caps that overhang the stem, tuck a foil ring or fiberfill nest under the rim. Bake by the package directions for the exact clay line.
Place the figure on a clay-dedicated ceramic tile so the broad base of the stem sits flat. If the cap overhangs the stem by more than a few millimetres, build a small support under the rim. A loose ring of crumpled foil or a small fiberfill nest carries the weight so the overhang does not sag or crack during cure.
Bake at the temperature and time on the package for the clay line you used. Verify the real tray-height temperature with an oven thermometer before trusting the dial. The bake support guide covers support shapes for figurines and overhangs in more detail.
Step 7: Cool Fully Before Handling
Polymer clay is fragile while warm. Leave the figure on the tile until it is cool to the touch before lifting it.
This is the easiest step to skip and the easiest to regret. A warm mushroom feels firm but bends and cracks under finger pressure, especially at the cap rim and the stem-cap join. Wait until the figure is cool to the touch before moving it off the tile. On a small piece this is usually 15 to 20 minutes after the bake ends; on a figurine, longer.
Once cool, inspect the figure under raking light. Look for hairline cracks at the rim and join, dull or shiny patches that suggest uneven heat, and any spots that lifted away from the cap. Most issues at this stage trace back to bake or support choices, not to the clay itself.
Variations to Try
Once the basic build feels stable, four small changes give you four distinct mushroom styles. Each one uses the same seven-step logic with one targeted change.
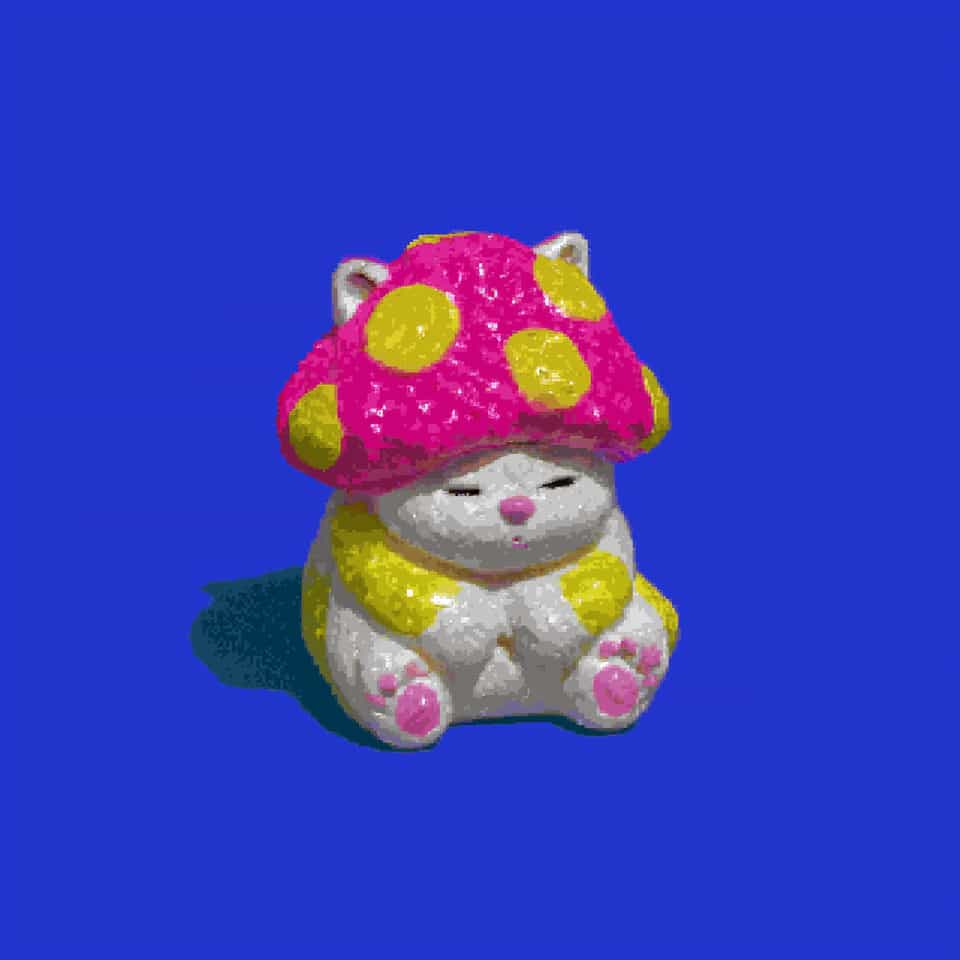
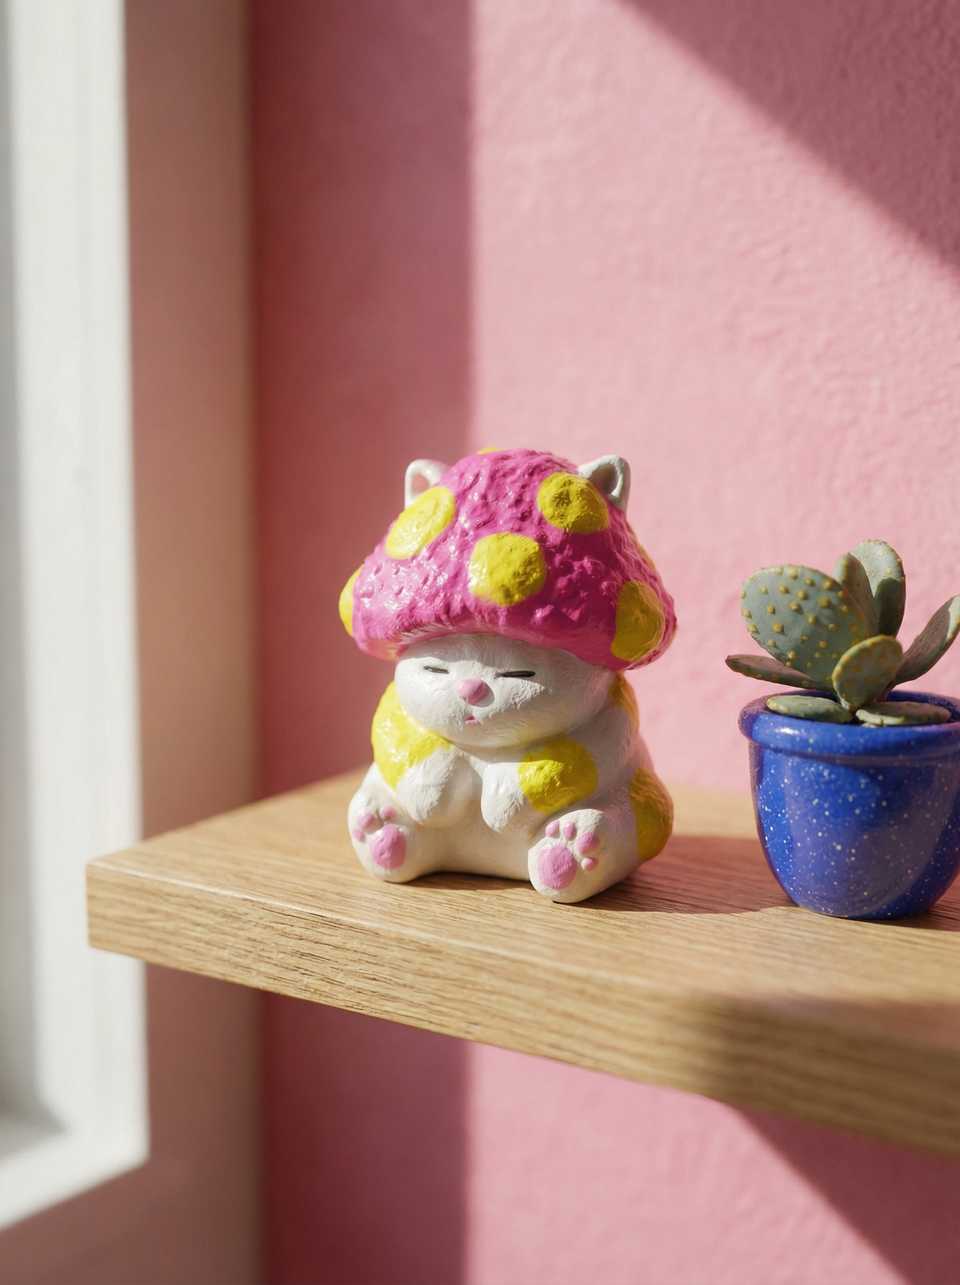
- Mushroom-cat hybrid. Replace the spotted cap with a cat-face dome and add small ear shapes at the cap top. The mushroom cat figurine is a useful reference for how the cap and face share the silhouette.
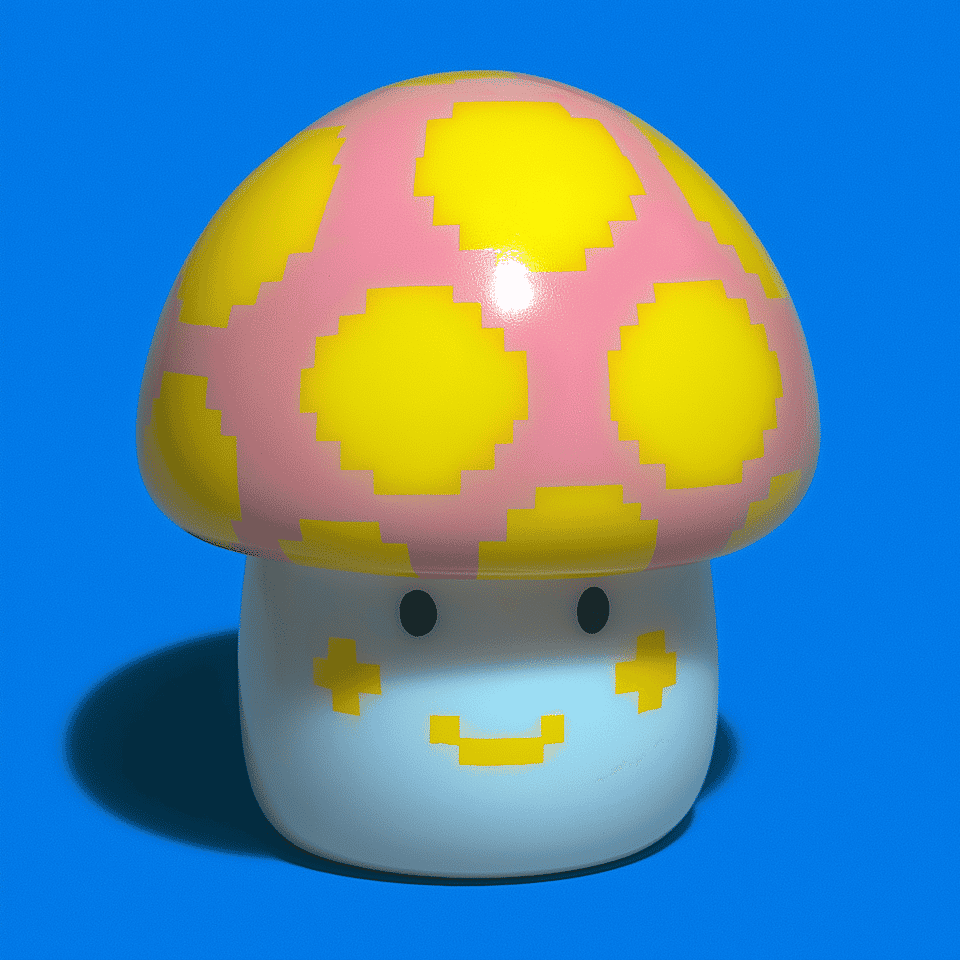
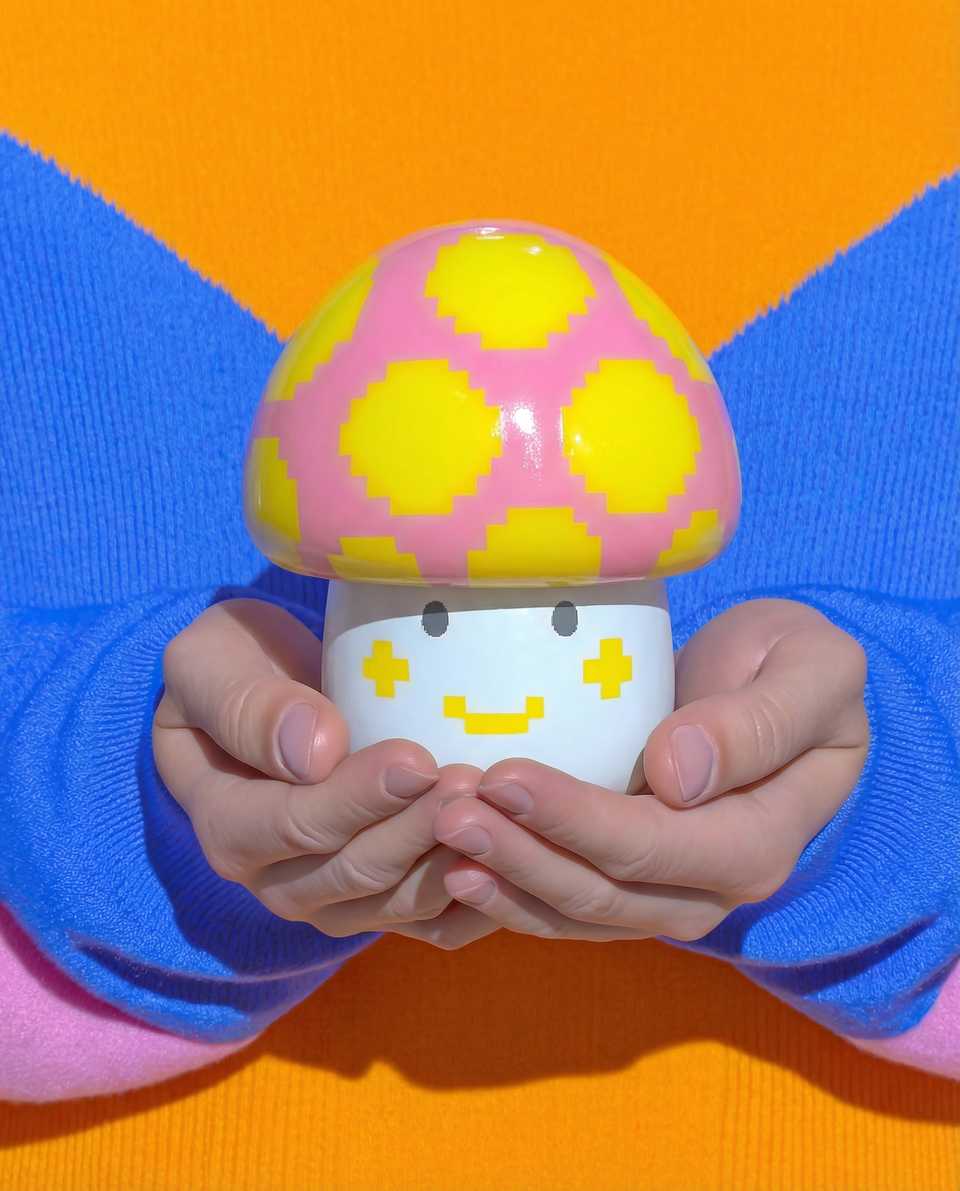
- Pixel mushroom brooch. Build the silhouette from stacked square pixels rather than rolled spheres, then mount on a brooch back. See the pixel mushroom brooch for the stair-step edge profile.
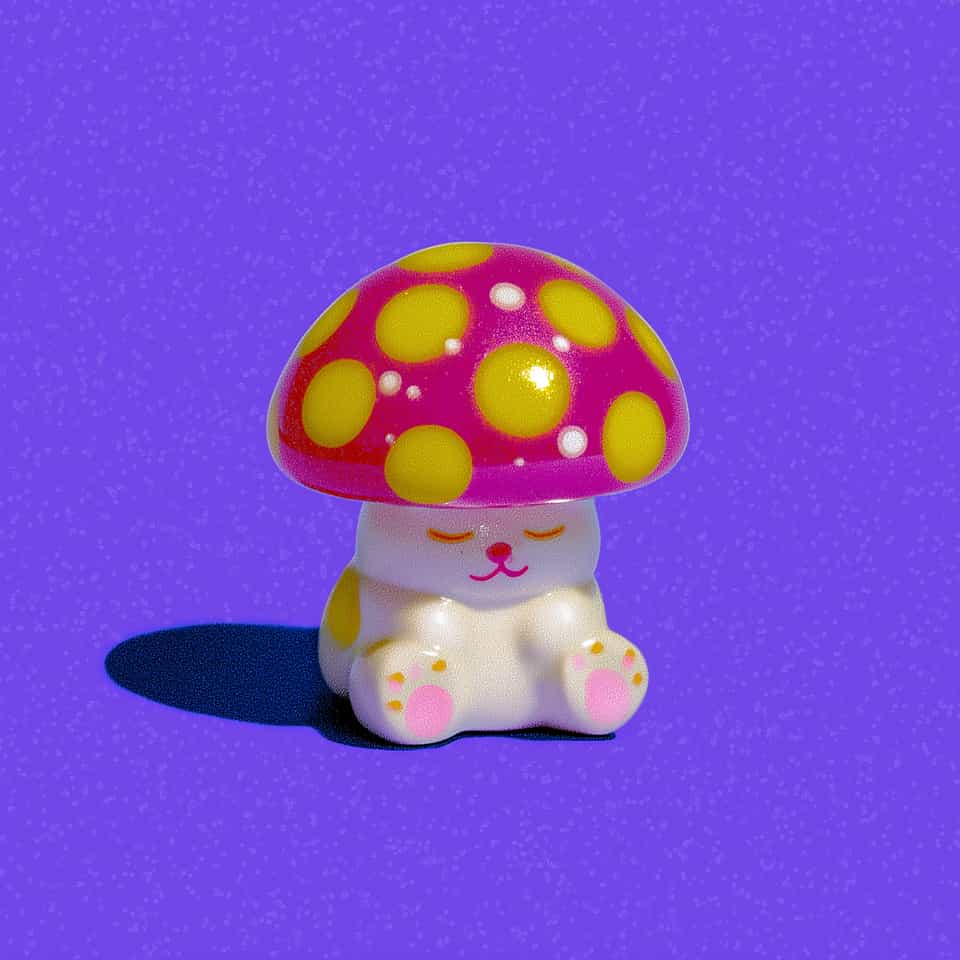
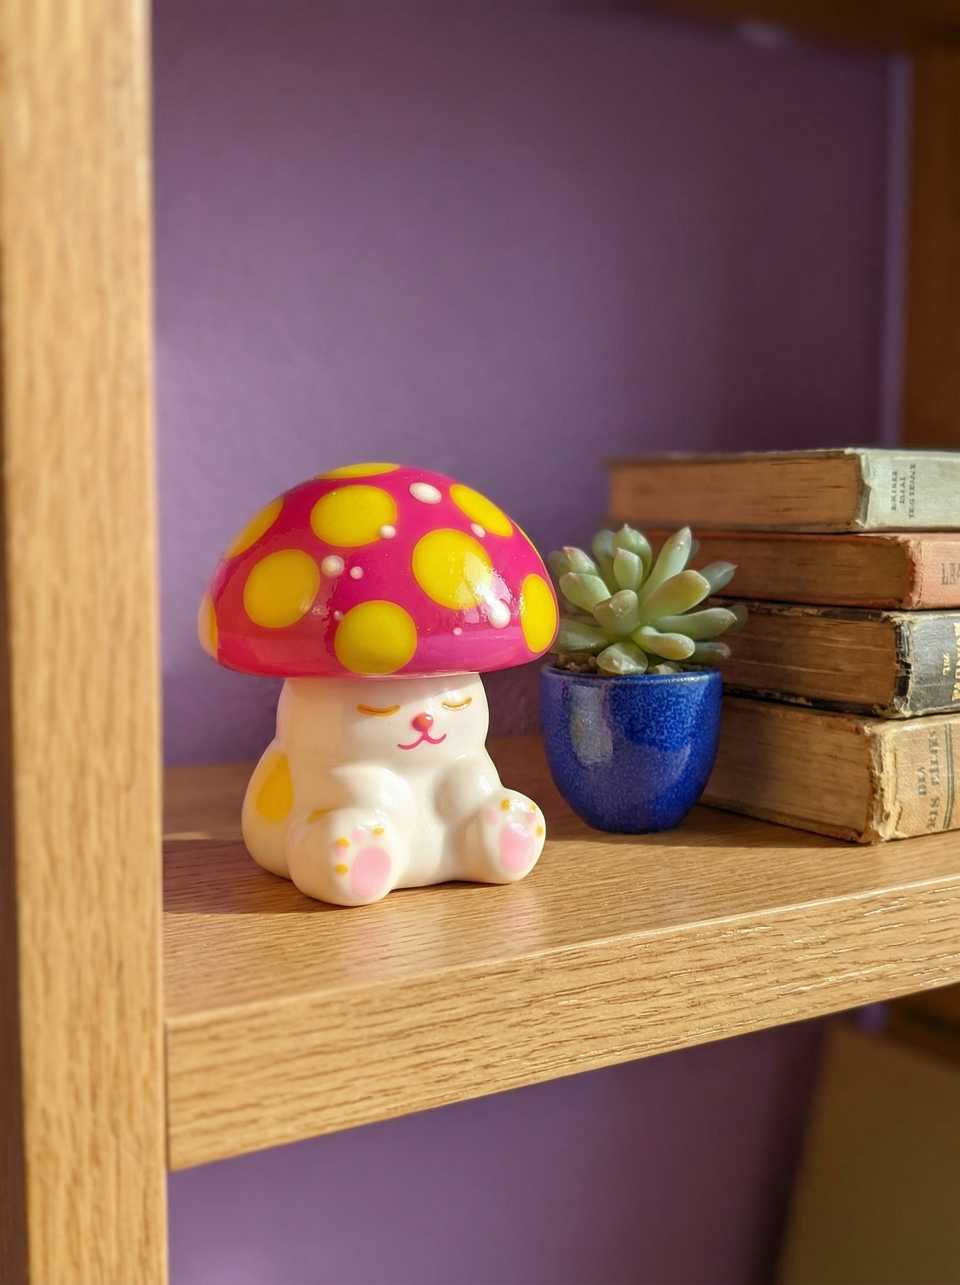
- Pebbled-cap textured mushroom. Roll the cap surface across a coarse texture sheet before adding spots. The signal mushroom figure shows the surface read at a brighter palette.
- Mushroom creature with face. Add a small face to the stem and treat the cap as a hat. The kawaii mushroom creature shows how cap and face proportions interact.
- Leafy forest mushroom. Add small leaf or moss shapes at the stem base for a forest scene. The leafy mushroom cat mixes mushroom and forest motifs.
- Blue-cap mushroom cat. Swap the red cap for cobalt and lean into a cooler palette. The blue cap mushroom cat shows the cool-palette variation.
Common Failures and Fixes
Most first-mushroom problems are mechanical and trace back to a single step. Walk through this list before redoing the whole figure.
The cap cracks during bake
Almost always under-baked clay or an unsupported overhang. Re-bake the same piece for the remaining time at the package temperature, then add a foil ring or fiberfill nest under any overhang next time. The cracking guide covers diagnosis by crack location.
The figure leans after bake
The stem base was not broad enough to carry the cap weight. On the next build, flatten the bottom of the stem against the tile until it spreads slightly wider than the body of the stem, and re-check that the cap is centred over the stem axis before bake.
Spots fall off after cure
The spots were pressed onto the cap rather than into it. Roll fresh spots, flatten them, and press with firmer, more even pressure on the next mushroom so the white clay bonds into the cap surface. For an existing piece, a tiny dot of bake-and-bond and a short re-cure usually rescues a fallen spot.
The surface reads dull and lifeless
Cured polymer clay reads matte straight out of the oven. That is normal. If you want a satin glow, add a thin water-based satin sealer or a clear soft wax once the piece is baked and cooled. Test the finish on a scrap piece of the same clay line first because not every sealer pairs cleanly with every line.
The mushroom feels heavy as a brooch
A solid cap is heavier than the brooch back can carry comfortably on light fabric. Rebuild the cap around a foil core so the figure stays light, or step the design down to a smaller cap. The stable bases and clean features guide covers weight planning for figurine builds.
The stem-cap join shows as a visible seam after bake
The join was not smoothed enough before bake, or the cap and stem clays were at different softness. Smooth the underside of the join more thoroughly on the next build, and condition both colors to the same firmness before assembly so they merge cleanly.
Working with Kids and Studio Safety
Mushrooms are a popular first project for kids, so a few studio rules matter before the bake.
- Adult supervision for the oven step. The oven and the hot tile are the real risk during the bake, so an adult should run preheat through cool-down, especially in a small toaster oven where the cavity stays hot.
- Ventilate during bake. Open a window or run a fan in the room while the piece cures. The cure smell is mild, but light ventilation keeps the room comfortable.
- Keep clay tools and surfaces separate from food prep. Once a tile, blade, or pasta machine has touched raw clay, retire it from food use for good. Store raw clay cool, sealed, and out of reach of children and pets.
- Small finished mushrooms can be choking hazards for very young children. A cap-sized stud topper or a small figurine is the right scale to read as a candy or a toy by a child under 3. Keep finished pieces out of reach if you are making them around very young children.
The polymer clay safety and studio setup guide covers the full reference, including raw-clay storage, oven separation, and tool dedication.
What To Build Next
The mushroom is a clean entry into figurine and stud-topper work. The next reads expand stability, support, and finish.
For figurine-scale pieces with bigger caps and taller stems, read the stable bases and clean features guide. It covers base width, weight planning, and how to keep facial detail clear at small scales.
For any build with an overhanging cap, branch, or arch, read the bake support guide. The same foil-and-fiberfill logic that holds up a mushroom cap also holds up cantilevered features on more ambitious figures.
If your first mushroom cracked anywhere, the cracking guide walks through diagnosis by crack location and ties each fix back to a build or bake step. A cracked first piece is more useful as a diagnosis tool than as a finished figure.
For the broader kit picture, the beginner toolkit guide covers what to add after the first ceramic tile and tissue blade. Most of the upgrades that help mushroom builds are also the ones that help every other beginner project.
For a finished example to compare your build against, the signal mushroom figure in the lookbook shows a confident bright-palette read with a textured cap and a stable base. Use it as a reference for the cap shoulder line and the proportion of cap to stem.
More guides in this path
Open these when the next decision is material choice, attachment, or finishing.

Polymer Clay Surface Effects: Cane, Inlay, Texture, or Print
You added inlay or a cane slice and the surface cracked or the pattern dragged because you chose the wrong technique for the shape. Match the effect to the result you need: repeating pattern (cane), precise placement (inlay), raised detail (applique), or loose texture (marbling/print). Then go to the right deeper guide.
Polymer Clay Figurines: Stable Bases and Clean Features
Small figurines look simple until the base wobbles, the cap droops, or the face gets smudged while you are still shaping the body. This guide covers the order of operations that keeps polymer clay characters stable with cleaner features.
How to Support Polymer Clay During Bake by Shape
Your thin overhang drooped or the hollow body caved because it had no support inside the oven. Compare flat tiles, fiberfill, foil, and armatures by shape before you build another version.
Finished examples with related clay decisions
Each piece shows how a material, attachment, or surface choice changes the final form.