Polymer Clay Striped Buttons, Chevron Wraps, and Drum Blanks
Patterned polymer clay buttons get much easier when you lock the blank size first, then build stripes, chevrons, or wrapped sidewalls around that structure. This guide covers a clean build order for flat sew-through buttons and short drum blanks.
In brief
Key takeaways
- 1Lock the diameter, height, and hole spacing of the blanks before you start decorating patterned buttons
- 2Flat striped buttons are easiest when you build one clean patterned sheet first and cut the full set from it
- 3Drum buttons usually come together more cleanly when the side wrap or top motif is added after the short cylinder is already sized and pierced
- 4Chevron bands stay cleaner when you cut them with a blade and press them on lightly instead of stretching them into place
Patterned polymer clay buttons usually fail for one simple reason: the maker decorates too early. Once the stripes, chevrons, or marbled caps go on before the blank is stable, the whole set drifts in diameter, hole placement, and edge quality.
The cleaner build order is the opposite. Decide what kind of button you are making first, lock the blank, then add the pattern with as little stretching as possible.
There Are Two Main Build Families
Flat patterned buttons start from one sheet. Drum-style buttons start from one short cylinder or stacked blank.
That sounds obvious, but it changes everything about the build order:
- flat striped and chevron buttons want one evenly rolled sheet before you cut the circles
- drum buttons want the diameter, height, and hole spacing solved before you start wrapping or decorating the sides
Maker reference
Maker reference only. Verify brand instructions, seller details, dimensions, and safety guidance for your own setup.
Affiliate note
Some links in this article are affiliate links. If you buy through them, we may earn a small commission at no extra cost to you. As an Amazon Associate I earn from qualifying purchases.
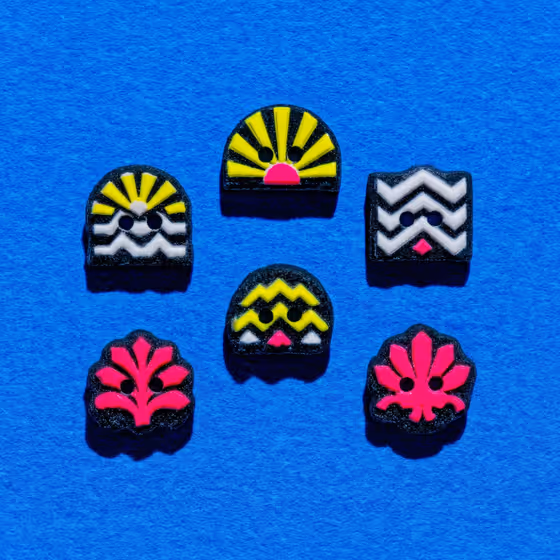
Flat Striped And Chevron Buttons
Build the full face pattern first, then cut the whole set from that patterned sheet.
- Condition each color to a similar softness so the joins do not drag or crack.
- Roll one base sheet to final thickness with a roller and guides.
- Cut clean stripes or zigzags with a blade and place them on the base without stretching them out of shape.
- Press just hard enough to bond the bands, then cut every button from the same sheet.
- Pierce the holes while the clay is still raw and bake the set flat on a tile if that matches your clay line's instructions.
Thin clay blades help you cut zigzags and stripe ribbons with less wobble than trying to improvise with a craft knife.
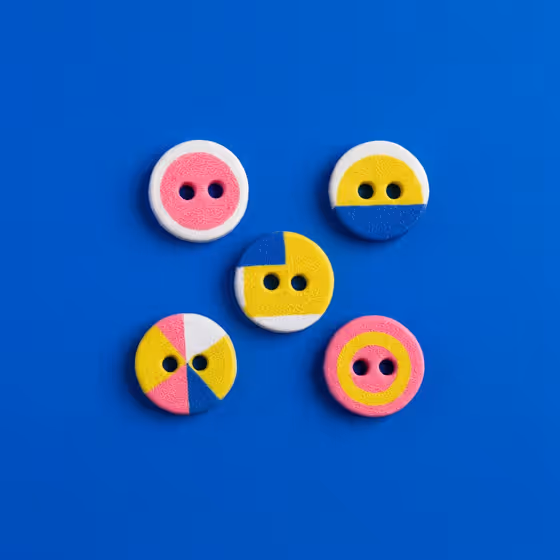
Drum Blanks And Wrapped Sidewalls
Make the short cylinder first, then add the side wrap, top motif, or carved face without changing the button height.
This is the safer path when the button has:
- a taller sidewall
- a wraparound chevron band
- a different face treatment on each blank in the same set
Cut or stack the drum blank, check that every button is the same height, place the holes, and only then add the decorative wrap or top piece. That order keeps the set coordinated even when the faces differ.
How To Keep Patterned Buttons Wearable
The holes still matter more than the pattern if you actually want the set to function on a garment.
That means:
- leave enough plain clay around the holes that the thread path does not chip
- do not let a chevron seam land exactly where the holes need to go
- keep the sidewall even so the button does not tilt when sewn on
Round cutters and thickness guides usually matter more than an expensive finish product at this stage.
Finish Choices For Patterned Buttons
Use the finish that suits the reference instead of glossing every set by default.
Choose a lighter sanded or buffed finish when the pattern needs to stay crisp and graphic. Choose gloss only when the reference really depends on a lacquered, glassy, or magnified surface.
Sculpey Gloss Glaze is one finish option to test when you want more shine, but check compatibility on baked scrap before you standardize it.
Use This Guide With The Lookbook
If an inspiration page mentions striped buttons, chevron wraps, or drum blanks, use this guide to choose the right build order before you start copying the colors.
That is the decision that keeps patterned buttons from drifting into six different diameters, six different heights, and six different fit and finish outcomes.
Take the next step
Continue the series with the next guide in this path.