Polymer Clay Skinner Blends, Gradients, and Ombre Slabs
Use Skinner blends when the color transition is the design feature. This guide covers conditioning, blend setup, when to cut the final shape, and how to keep popsicles, arches, and other flat pieces from turning muddy.
In brief
Key takeaways
- 1Condition both colors to the same softness before you start the blend or the fade will stretch unevenly
- 2Build the gradient sheet before you cut the final arch, popsicle, or slab shape
- 3Stop folding once the transition is smooth or the colors can start to muddy
- 4Add sprinkles, applique, or hardware planning only after the gradient is already locked
Gradient polymer clay pieces only look good when the color fade feels deliberate. If the blend is patchy, overworked, or cut after the sheet has already stretched out of shape, the whole piece starts reading messy instead of clean.
That is why the build order matters. Make the blend first, then cut the final silhouette, and only then add sprinkles, applique, or hardware planning. Popsicles, arches, pendants, and badge-like slabs all get better when the gradient is treated as the main structure rather than as a last-minute effect.
Maker reference
Maker reference only. Verify brand instructions, seller details, dimensions, and safety guidance for your own setup.
Affiliate note
Some links in this article are affiliate links. If you buy through them, we may earn a small commission at no extra cost to you. As an Amazon Associate I earn from qualifying purchases.
Condition Both Colors To The Same Softness
A Skinner blend works best when both colors feel equally workable before you start folding.
Clay that is still crumbly or drags at the edges will not build a clean sheet. If one color is soft and the other is still stiff, the blend stretches unevenly and the fade goes dirty fast.
Acrylic roller for polymer clay helps flatten both colors to the same starting thickness before you set up the blend.
Build The Gradient Sheet Before You Cut The Final Shape
The cleanest arches, popsicles, and badge-like slabs come from cutting the finished gradient sheet, not from trying to force a gradient onto a shape that is already cut.
That is the practical lesson from Sculpey's Skinner-blend method and from their earring guidance: keep the sheet stage controlled first, then move into shaping. Once the fade looks right, you can cut both earrings from one rectangle or cut the popsicle bars from the same sheet so the pair stays matched.
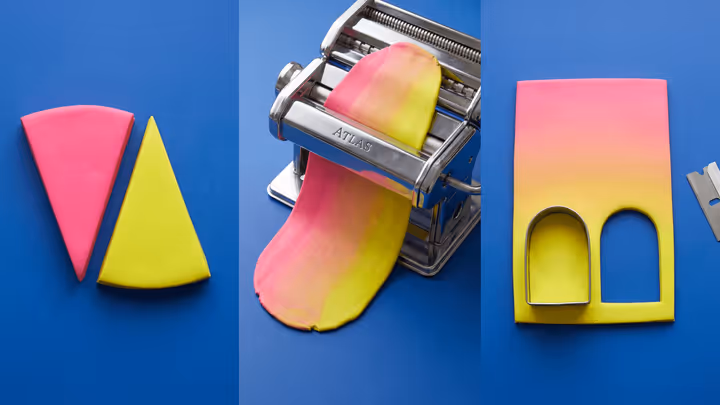
Use The Standard Skinner Fold
Triangle setup, same direction through the machine, repeat until the transition smooths out.
The reliable sequence is simple:
- Roll both colors to the same thickness.
- Cut each sheet into a right triangle.
- Join the two triangles into one rectangle with the diagonal seam running through the center.
- Run that rectangle through the machine in the same orientation each pass.
- Fold and repeat until the blend loses its hard seam and becomes one smooth fade.
Atlas Pasta Machine is useful here because the blend gets cleaner much faster when the passes stay repeatable.
Stop Once The Fade Is Smooth
Too many passes can be just as bad as too few.
If the seam is gone and the transition already looks soft, keep going only if you still see harsh bands. Extra folding after that point can warm the clay too much and start smearing the fade, especially on pink-and-white or yellow-and-pink palettes where muddiness shows fast.
Cut The Pair From One Sheet
If you are making earrings, cut both pieces from the same finished blend sheet before the clay warms up again.
This is what keeps the pair consistent. On arches, the left and right fade can mirror each other. On popsicles, both bars can carry the same pink-to-cream transition before you add the bite mark, stick, or sprinkle colors.
Clay Blade Set makes it easier to square the sheet and trim clean notches without dragging the gradient.
Add Surface Details After The Blend
Sprinkles, eye details, tiny applique, or hardware marks belong after the gradient is already built.
This matters on faux-food pieces especially. A popsicle gets its main read from the broad fade. The sprinkles, bite mark, and stick should support that read, not interrupt the blend while it is still being formed.
Bake Flat And Finish Lightly
Flat gradient slabs are often easiest to cure on a tile, but follow your clay line package instructions first and only add support when the thickness or shape calls for it.
Follow your clay line package instructions first, then verify the real tray temperature with a thermometer, support the piece only as its thickness and shape require, and let it cool fully before finishing. If the gradient already looks good after cure, keep the finish light so the color transition stays the main event.
Use This Guide With The Lookbook
If an item page mentions a Skinner blend, gradient sheet, or ombre slab, this is the guide behind that advice.
It is most useful for:
- gradient arches and other simple slab earrings
- faux-food popsicles and dessert bars
- flat pendants or tiles where the color fade does the visual work
Take the next step
Continue the series with the next guide in this path.
