In brief
Key takeaways
- 1Roll the slab evenly before you print anything so the graphic stays consistent from one piece to the next
- 2Seal the screen or stencil cleanly and use one thin tested paint or medium pass to keep the halftone dots from flooding together
- 3Let the printed surface dry before cutting the final silhouette or the edge will drag the graphic
- 4Graphic slab earrings often stay sharper with matte or satin finish paths than with a thick gloss coat
Graphic slab earrings go wrong when the maker treats them like sculpture. The moment the slab gets too thick, the print gets smeared, or the final cut happens before the surface is settled, the whole thing starts looking muddy instead of sharp.
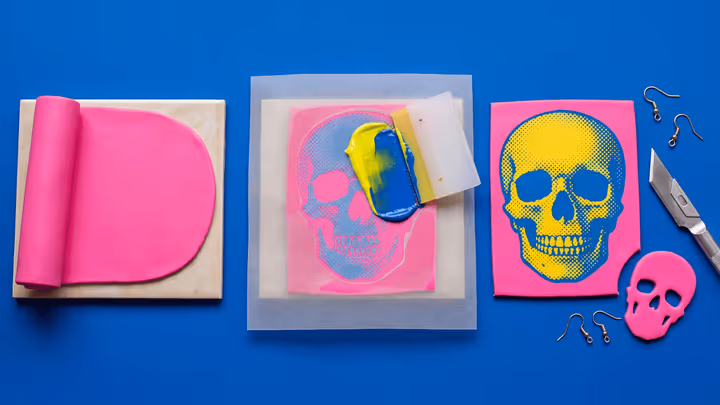
The cleaner build order is simple: roll the slab first, print the graphic second, cut the final silhouette third, and assemble the hooks only after cure. That is the path that keeps halftone skulls, bold plaques, and stencil-led earrings readable.
Maker reference
Maker reference only. Verify brand instructions, seller details, dimensions, and safety guidance for your own setup.
Affiliate note
Some links in this article are affiliate links. If you buy through them, we may earn a small commission at no extra cost to you. As an Amazon Associate I earn from qualifying purchases.
Start With An Even Slab
The printed layer only looks crisp when the clay underneath is calm and even.
If the slab is thicker on one side, the screen pressure changes, the cut edge changes, and the pair stops matching. Roll the sheet first and only move on when both earring blanks can come from the same stable slab.
Acrylic rollers help here because they keep the sheet flatter and make it easier to see uneven spots before you print.
Think Of The Surface As A Print Pass
Dense halftone dots, shadow blocks, and repeated graphic marks often read more cleanly through a screen or stencil than through tiny hand-cut clay pieces.
When a reference reads like a printed graphic on a flat plaque, treat that as a likely recreation path rather than forcing it into a fully layered clay mosaic just because the finished object is made from polymer clay.
Seal The Screen Cleanly
The screen or stencil needs to sit flat on the clay before the paint goes on.
If the edge lifts, the paint bleeds. If the screen shifts, the face or skull warps. Hold the screen steady, use one thin tested pass of paint or medium, and lift it cleanly instead of dragging it across the slab.
Silkscreen and stencil kits for polymer clay are most useful when you want a repeated halftone or graphic texture without painting each mark freehand.
Let The Surface Dry Before You Cut
Cutting too soon is one of the quickest ways to drag a good print.
Once the surface layer is on, give it enough time to stop dragging. Then cut the final skull, plaque, or face silhouette with one clean pass. This preserves the printed edge much better than trimming while the surface is still tacky.
Clay blades help because a thin sharp blade disturbs the printed surface less than a dull knife.
Keep The Hook Point On The Balance Line
Graphic slabs usually read more clearly when they face forward from the visual balance line of the finished shape.
Skulls, faces, and plaque earrings usually need the hook point near the visual balance line of the finished shape. If the hole drifts too far to one side, the earring can hang crooked and the graphic may stop reading straight on. Test-hang the piece before you finalize the hole or ring closure.
Finish Lightly
Matte or satin often keeps the print crisper than a thick gloss coat.
The more printed and graphic the surface is, the more likely a heavy gloss will blur it. If you want a coated finish, test compatibility on a scrap first. Save heavy shine for pieces where the gloss is part of the design, not just a habit.
Use This Guide With The Lookbook
If an item page mentions silkscreen, stencil, halftone, or a graphic slab surface, use this guide as the practical build logic behind that language.
It is most useful for:
- halftone skull drop earrings
- memento mori and pop-graphic slab earrings
- future printed plaque, stencil-face, and bold graphic drop builds
Take the next step
Continue the series with the next guide in this path.
