How to Attach Brooch Backs to Polymer Clay
A brooch front can look strong and still hang poorly if the back is crooked, under-sized, or glued to a curved surface. This guide explains flat backs, balance, and more reliable attachment options to test for polymer clay pins.
In brief
Key takeaways
- 1Many flat polymer clay brooches are easier to tune when the front is cured first and the finding is tested after bake
- 2Do not assume raw clay will permanently bond itself to smooth metal without a mechanical wrap or later adhesive
- 3A brooch finding works best on a flat rear zone with enough contact area for the pad to sit flush
- 4Placement along the balance line matters as much as glue choice if you want the brooch to hang straight
The front of a polymer clay brooch gets most of the attention, but the back does a lot of the practical work. A beautiful eye brooch or floral disc can still hang badly if the pin back is crooked, perched on a curve, or attached to too little surface area.
For many lookbook-style brooches, a common low-complexity path is to build a front that includes a flat rear zone, bake it cleanly, then test a flat-pad finding on the cured back with the adhesive and placement that best fits the finished piece.
First Rule: Do Not Assume Clay Permanently Bonds To Metal On Its Own
Polymer clay does not reliably bond to non-porous surfaces like metal just because it was baked against them.
That means you have two honest options:
- adhesive attachment after cure for flat pad brooch findings
- mechanical trapping or wrapping when the design is intentionally built around the finding
Most flat graphic brooches and floral brooch discs will use the first path.
Maker reference
Maker reference only. Verify brand instructions, seller details, dimensions, and safety guidance for your own setup.
Affiliate note
Some links in this article are affiliate links. If you buy through them, we may earn a small commission at no extra cost to you. As an Amazon Associate I earn from qualifying purchases.
Best Brooch Backs For Flat Clay Fronts
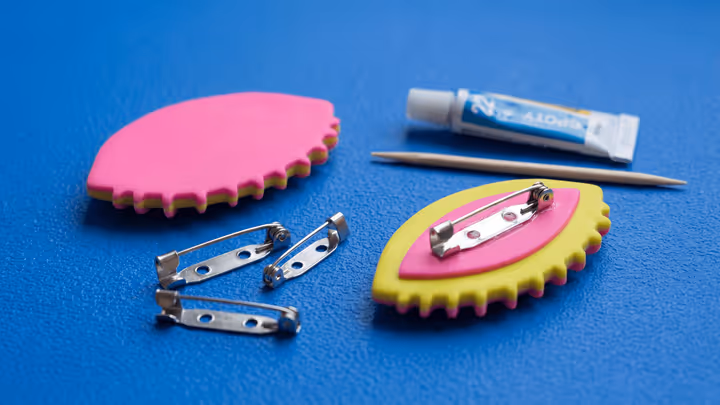
A flat-pad brooch finding is a common default because it gives the adhesive a broad, stable contact area.
Brooch pin backs with flat pad are a straightforward option to test for eye brooches, cameo discs, floral pins, and other front-heavy clay shapes when the pad size and closure style fit the finished piece.
Design The Back Before You Decorate The Front
The front does not need to be plain, but the back needs one honest flat zone where the finding can sit flush.
If the back is domed, deeply textured, or hollowed unpredictably, you are creating an attachment problem before the brooch ever reaches the oven. Plan the rear contact area while the piece is still only a shape, not after the finished front already looks too good to touch.
Glue After Cure For Most Flat-Pad Findings
For most polymer clay brooches, bake the front first, let it cool fully, then attach the finding to the cured rear side.
This is cleaner for three reasons:
- you can place the hardware after you know the exact finished balance
- you do not risk shifting the finding while shaping the decorated front
- you can prepare the back specifically for the adhesive bond
Two-part epoxy for jewelry is useful when you want a little working time to get the placement right.
Instant glue for polymer clay findings is useful when the back is already prepared and you want a faster bond.
Adhesive performance varies by finding finish, rear-surface prep, and glue brand, so test on cured scrap when the hardware path is new to you, follow the product instructions for mix and cure time, and let the adhesive fully cure before you treat the bond as ready for a wear test.
Where The Finding Should Sit
Place the brooch back along the balance line, not just wherever it physically fits.
Ask yourself:
- Will the top-heavy part of the brooch try to tip forward?
- Does the finding sit on the widest stable area of the back?
- Will the pin still feel centered once the piece is worn on fabric?
A brooch that hangs straight usually comes from balanced placement, not from stronger glue alone.
When Mechanical Trapping Makes More Sense
If the design allows you to wrap clay around part of the finding or build a recessed hardware channel intentionally, that can reduce reliance on adhesive alone.
This approach is most useful when the shape is thick enough to hide the hardware plan cleanly. For many flat graphic brooches, though, the extra bulk is not worth it and a clean flat-pad back is the simpler solution.
Common Brooch-Back Mistakes
- Curved back: the finding only touches at one point and pops off later
- Undersized finding: the brooch rotates or feels top-heavy on fabric
- Bad placement: the piece tilts even though the front looks symmetrical
- Rushing glue-up: the finding shifts before the adhesive is fully set
Use This Guide With The Lookbook
If an item page tells you to add the brooch back after cure, treat that as a hardware choice made to protect the front and improve balance, not as generic placeholder copy.
Use this guide first for:
- flat graphic brooches
- flower-disc and cameo-style pins
- any piece where the front is clear but the hardware is hidden in the photo
Take the next step
Continue the series with the next guide in this path.