The Cling Wrap Trick for Smoother Polymer Clay Cutter Edges
If your cutters keep grabbing the clay or leaving rough edges, this guide explains when plastic wrap helps, which wraps are safer to use, when to skip it, and how to get a softer rounded edge when that suits the piece.
In brief
Key takeaways
- 1A thin cling-wrap layer softens cutter edges for domed, beveled tops without custom tools
- 2Use minimal pressure and sharp cutters to avoid stretching details and warping symmetry
- 3Re-chill soft clay between cuts to keep edges clean when using cling wrap
- 4Pair cling-wrap cuts with light post-bake wet sanding for a polished, intentional bevel finish
Many polymer clay makers keep cling wrap near their cutters because it can reduce sticking and soften the cut edge. It is useful when you want a rounded, pillowed finish instead of a sharp geometric cut.
But here's the thing: most tutorials just say "use plastic wrap" without explaining the why, the when not to, or the which kind. Some wraps actually damage polymer clay. Some cutter types don't work well with this technique. And sometimes you shouldn't use wrap at all.
Here's what's missing from those tutorials: the science, the specific products, and the advanced techniques that transform this simple trick into a serious time-saver.
Cling wrap (LDPE polyethylene) works as a short-term cutting barrier because polymer clay plasticizers grip it much less aggressively than they grip bare metal. The wrap also rounds and polishes cut edges during pressing, creating the soft domed profile that reduces or eliminates sanding on the edges. Keep the contact short - do not leave plastic wrap on raw clay for storage, because plasticizers can slowly migrate into most plastics over time.
Why Clay Sticks And What Cling Wrap Does
Polymer clay sticks to cutters through four forces: oily plasticizer adhesion, microscopic edge grip, slight vacuum suction when pressing down, and warm hands softening the clay. Cling wrap breaks all of those at once while rounding the cut edge into a polished dome.
Before we solve the problem, let's understand it. Polymer clay sticks to metal cutters through four mechanisms working against you:
1. Plasticizer + Friction
Polymer clay contains oily plasticizers (that's what keeps it soft and workable). When pressed against metal under pressure, those plasticizers form a thin, slightly tacky film on the metal edge - like a weak adhesive.
2. Mechanical Grip
Cutter edges are rarely perfectly smooth. Microscopic scratches and the tiny bevel on the cutting edge grab soft clay like Velcro hooks catch loops. The rougher the edge, the worse the sticking.
3. Suction/Vacuum Effect
When you press a cutter straight down and hold it tight against the clay, air has little space to re-enter. A slight vacuum forms, plus the clay's flexibility lets it conform into the cutter - making the shape want to stay inside.
4. Temperature
Warm hands + rolling pressure = warmer, softer, stickier clay. The longer you handle clay, the more it heats up and the more it wants to stick to everything.
The Science of Cling Wrap
Cling wrap (LDPE polyethylene) is a smoother, less reactive barrier than bare metal, so polymer clay does not grip it as strongly during a short press. For short contact this lets the clay slide off instead of sticking. Over long contact, plasticizers can slowly migrate into most plastics, so do not use cling wrap for raw-clay storage.
Using plastic wrap between your cutter and clay creates a slick barrier that prevents sticking, gently rounds edges into a polished dome, and blocks dust and fingerprints. Three distinct benefits show up in practice:
Reduces sticking and tearing. The cutter edge never contacts bare clay - it cuts through the plastic barrier. When you lift, the clay separates from the wrap easily instead of being dragged up with the cutter.
Rounds and polishes edges. This is the main aesthetic reason artists use the technique. The wrap stretches down into the cut as you press, gently compressing and beveling the edge of the clay. You get a soft, domed profile that requires far less sanding - sometimes none at all.
Keeps clay clean. The wrap blocks dust, fingerprints, and lint from your clay surface while you roll and cut. Less cleanup, faster production.
Maker reference
Maker reference only. Verify brand instructions, seller details, dimensions, and safety guidance for your own setup.
Affiliate note
Some links in this article are affiliate links. If you buy through them, we may earn a small commission at no extra cost to you. As an Amazon Associate I earn from qualifying purchases.
The Step-by-Step Technique
Roll your slab evenly, stretch cling wrap taut over the surface without wrinkles, press your cutter straight down firmly, then lift and peel the wrap away.
Here's the professional method for cutting shapes with cling wrap:
1. Prepare Your Slab
Condition and roll your clay to even thickness (2-3mm for most earrings). Use thickness guides or a pasta machine with spacers for consistency.
2. Position on Work Surface
Place the slab on a ceramic tile or glass surface so it sticks slightly and won't move during cutting.
3. Apply the Wrap
Tear a piece of Glad Cling Wrap large enough to cover your slab with a few inches of margin. Lay it over the clay, pulling it taut. Burnish lightly with your fingers or an acrylic roller from center outward to remove bubbles and wrinkles.
Don't Skip This Step
Wrinkles in the wrap will transfer as marks on your clay. Take the extra 10 seconds to get it smooth. If it won't cooperate, lift and re-lay rather than fight it.
4. Position and Press
Use the sharp edge of your cutter (not the rolled rim if there is one). Position over your clay and press straight down in one firm, decisive motion until you feel the tile beneath.
5. Even Pressure for Large Shapes
For larger cutters, wiggle very slightly or roll your acrylic roller across the top of the cutter to ensure even pressure around the entire perimeter.
6. Lift and Remove
Lift the cutter straight up. Leave the cut piece on the tile, peel away the surrounding scrap clay first, then peel off the cling wrap from your shape. Finally, use a flexible tissue blade to gently lift the piece from the tile.
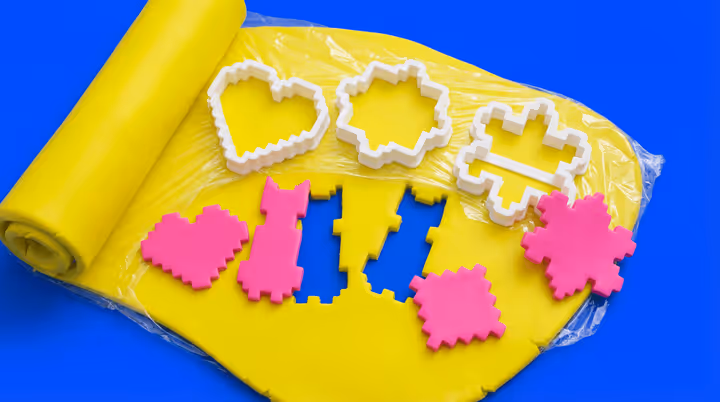
Which Cutters Work Best?
Resin 3D-printed cutters with beveled edges and thin stainless steel cutters give the cleanest results because their sharp edges slice through plastic wrap cleanly.
Not all cutters respond equally well to the cling wrap technique. Here's how different types perform:
Resin 3D-Printed Cutters (Beveled Edge) - Best
A popular choice for cling wrap cuts. Well-designed resin cutters have a sharp inner edge that cuts cleanly, and an outer wall that slopes away to push scrap clay outward. They slice through wrap without dragging it, giving you professional, lightly rounded edges with minimal sanding.
Metal Cutters (Sharp Edge) - Excellent
Thin, sharp stainless steel cutters work beautifully with wrap. The metal conducts slight cold from your hands, which can help firm up warm clay. Metal edges cut wrap cleanly rather than stretching it.
Plastic Cutters (Rounded Edge) - Fair
Commercial plastic cutters often have thicker, more rounded edges. They tend to stretch the wrap rather than cutting it cleanly, which can cause more doming than you want and occasional edge distortion.
Cookie Cutters - Variable
Designed for dough, not clay. Most have thick, rolled edges that compress rather than cut, giving a very domed, "pillowy" look. Fine for simple shapes if that's the aesthetic you want, but not for detailed work.
Filament (FDM) 3D-Printed Cutters - Worst
The layer lines from filament printing create friction that grabs both clay and wrap. Cling wrap can snag in the ridges and deform your shape. Sand the cutting edge smooth before use, or reserve these cutters for direct cutting without wrap.
| Cutter Type | Wrap Compatibility | Edge Quality | Doming Level |
|---|---|---|---|
| Resin 3D-printed (beveled) | Best | Clean, professional | Controlled, light |
| Thin stainless steel | Excellent | Clean, sharp | Moderate |
| Commercial plastic | Fair | Stretches wrap, uneven | Excessive |
| Cookie cutters | Variable | Compresses, pillowy | Very heavy |
| FDM 3D-printed | Poor | Snags wrap in layer lines | Unpredictable |
When To Skip Cling Wrap And What To Use Instead
Skip cling wrap when you need sharp geometric edges for tessellations, when using tiny detailed cutters, when working ultra-thin, or when cutting many shapes from one slab. Cornstarch, baby powder, a water mist, or a light mineral-oil film all release clay without the doming cling wrap causes.
The wrap technique isn't always the right choice. Skip it in these situations:
You Need Sharp, Precise Edges
Cling wrap inherently rounds and softens edges. If you're making tight tessellations (puzzle pieces that must fit together), geometric inlays, or components that need to stack precisely - use cornstarch instead.
Highly Detailed or Tiny Cutters
Fine details get blurred because the plastic rounds everything over. Micro cutters can trap tiny scraps in the cutter where the wrap bunches. For intricate designs, cut directly with a release agent.
Very Thin Work
When rolling ultra-thin (under 1.5mm), the doming effect can make some areas too thin or inconsistent, increasing the risk of warping or breakage during baking.
Multiple Cuts in Same Area
If you're cutting several shapes from the same slab and need to reposition the wrap repeatedly, it can tear and drag, leaving ragged edges or embedded bits of plastic.
Cornstarch or baby powder is the best alternative to cling wrap when you need crisp, geometric edges. Lightly dust the cutter or clay surface and tap off the excess. Unlike cling wrap, powder release agents do not round or dome the edges at all, making them the preferred choice for tessellations, snap-fit pieces, and detailed inlay work where shapes need to butt together precisely.
Cornstarch or Baby Powder
The classic release agent. Lightly dust your cutter edge or clay surface, tap off excess. Gives you crisp, sharp edges with easy release. May slightly affect surface finish on glossy pieces - buff or wipe away residue before baking.
Water Mist
A light mist on metal cutter edges reduces sticking while keeping edges sharp. Works well with firmer clays. Must dry completely before painting or sealing.
Baby Oil (Mineral Oil)
Thin film on the cutter for stubborn sticking. Very effective but can weaken thin pieces if overused. Wipe or wash off residue after baking if visible.
Silicone Mat Work Surface
Not a release agent for cutters, but cutting directly on a silicone mat gives non-stick release from the work surface. Combined with cornstarch on cutters, this is the sharp-edge alternative to cling wrap.
Wraps And Clay Brands That Work Best
Glad Cling Wrap and Glad Press'n Seal are common polymer clay choices because their LDPE formula does not react with clay plasticizers during short-term contact.
Not all kitchen wraps are safe for polymer clay. Some can leach plasticizers out of your clay, making it brittle. Here's what works:
Use LDPE (low-density polyethylene) wraps like Glad Cling Wrap or Glad Press'n Seal for polymer clay cutting. Store-brand and generic wraps vary by region and formula, so test unfamiliar wraps on scrap clay for 48-72 hours before using them on finished pieces.
Recommended: Glad Cling Wrap
Glad Cling Wrap is a common choice for polymer clay cutting. It's LDPE (low-density polyethylene), releases cleanly, and doesn't react with clay plasticizers during normal use.
Recommended: Glad Press'n Seal
Glad Press'n Seal has a slight adhesive grip that makes it excellent for cutting through, compressing canes, capturing surface treatments (foils, mica powders), and keeping small pieces organized on a tile. Many artists keep both types on hand.
Use With Caution: Stretch-Tite
Stretch-Tite is thicker and clings more aggressively - great for strong compression and dramatic distortion effects on firm clays like Kato. But it can over-stretch thin veneers. Test with scrap before using on production pieces.
Avoid: Generic/Store Brands (Until Tested)
Store brand wraps vary by region and formula. Some react with polymer clay plasticizers, leaving residue or making clay sticky. Always test: wrap a scrap piece for 48-72 hours, then check if the wrap peeled off cleanly or fused to the surface.
Avoid: Press-and-Seal With Heavy Adhesive
Some adhesive wraps leave a tacky residue that transfers to the clay surface. If you notice stickiness after removing wrap, switch brands.
How Different Clays Behave
Soft clays like Soufflé dome dramatically under cling wrap while firm clays like Kato barely respond, so match your brand to the edge profile you want. Your clay brand affects how much doming and distortion you'll get:
Sculpey Soufflé - Most Distortion
Soft and forgiving, Soufflé distorts easily under cling wrap. You'll get pronounced pillowing and very rounded edges. Great for organic, puffy shapes; be gentle to avoid over-stretching thin pieces.
Sculpey Premo - Balanced
The sweet spot for most jewelry makers. Premo holds details well but still responds to the wrap technique with controlled, subtle edge rounding. Predictable and forgiving.
Fimo Professional - Minimal Distortion
Firmer clay that resists over-distortion. Excellent when you want just a small bevel on edges while maintaining pattern integrity. Works well with thinner wrap.
Kato Polyclay - Least Distortion
The stiffest common brand. Kato barely responds to cling wrap pressure - you'll get crisp shapes with only the tiniest edge rounding. Ideal for detailed cane slices and graphic designs that need to stay sharp.
| Clay Brand | Firmness | Doming with Wrap | Best Edge Style |
|---|---|---|---|
| Sculpey Soufflé | Soft | Heavy - very rounded | Organic, puffy shapes |
| Sculpey Premo | Medium | Moderate - controlled | Most jewelry styles |
| Fimo Professional | Medium-Firm | Light - subtle bevel | Pattern-preserving cuts |
| Kato Polyclay | Firm | Minimal - barely rounds | Crisp cane slices, graphic designs |
Advanced Techniques
Double-layer wrapping creates puffier domes, chilling clay before cutting gives cleaner shapes, and selective coverage with cut windows lets you control which edges get rounded.
Once you've mastered the basics, try these professional-level variations:
Double-Layer Wrapping
Stack two layers of cling wrap for extra pronounced doming. The additional cushion creates very rounded, pillowy edges - useful for chunky earrings or organic shapes where you want maximum softness. Roll clay slightly thinner to compensate for the compression.
Chilling Clay Before Cutting
Place your rolled slab in the refrigerator for 5-10 minutes before applying wrap and cutting. Firmer clay distorts less, giving you cleaner shapes with more controlled doming. Essential for soft brands like Soufflé in warm weather.
Selective Doming (Partial Coverage)
Cut a window in your cling wrap so only part of the cutter passes through plastic. This lets you create pieces where the outer edge is domed but inner cutouts stay sharp - or vice versa.
Sequencing for Complex Shapes
For cutters with interior details:
- Cut the outer shape with cling wrap for soft outer edges
- Remove the wrap
- Cut interior details without wrap for crisp internal lines
This avoids shredding the wrap on repeated cuts and gives you the best of both worlds.
Variable Tension for Different Effects
- Tight stretch: More doming, smoother surface, fewer wrinkles
- Looser placement: Less doming, but higher risk of creases
- Offset stretch: Pull tighter in one direction for asymmetrical rounding (great for faux cabochons with a heavier dome on one side)
Troubleshooting Common Problems
Wrap sticking means clay is too warm, wrinkle marks mean wrap was not taut, and uneven doming means you rocked the cutter instead of pressing straight down.
Wrap Sticking to Clay Instead of Releasing
Cause: Clay too warm/soft, wrap too thin, or left on too long.
Fix: Chill clay 5-10 minutes first. Use quality wrap (Glad). Remove immediately after cutting. Light cornstarch dusting on clay before wrap can help.
Wrinkle Marks on Clay Surface
Cause: Wrap not stretched taut, using reused/crinkled wrap, pressing too hard with fingers.
Fix: Pull wrap snug before cutting. Use fresh, flat pieces each session. Light roller touch only - don't emboss wrinkles into the clay.
Uneven Doming or Bevel
Cause: Uneven wrap tension, rocking motion instead of straight press, uneven clay thickness, dull cutter.
Fix: Stretch wrap evenly in all directions. Press straight down in one motion. Use thickness guides when rolling. Ensure cutter edge is clean and sharp.
Wrap Tearing During Cutting
Cause: Wrap too thin, cutter has rough/jagged edges, too much sideways movement.
Fix: Use good-quality kitchen wrap. Sand rough cutter edges smooth. Cut in one decisive downward press - no sawing or twisting.
Residue Left on Clay
Cause: Certain wrap formulas react with clay plasticizers, especially with prolonged contact.
Fix: Switch to Glad brand. Minimize contact time - place wrap, cut, remove immediately. Gently wipe raw clay with barely damp lint-free cloth if residue appears.
Tools And Production Tips
An acrylic roller with thickness guides, ceramic tile work surface, flexible and rigid tissue blades, sharp cutters, and a needle tool for air bubbles complete the setup. Pair that kit with a few simple batching habits and the technique scales to high-volume sessions.
Cling wrap cutting goes more smoothly with these supporting tools:
Acrylic Roller with Thickness Guides
Rollers with removable rings ensure even clay thickness across every slab. Consistent thickness = consistent doming. Look for 6-9" length, 1-1.5" diameter.
Glass or Ceramic Work Surface
Smooth, non-stick surfaces that hold clay in place while cutting. 6x6" ceramic tiles are easy to source and you can bake directly on them.
Tissue Blade Set
A set with flexible and rigid blades lets you lift pieces without distortion and slice cleanly. Flexible blades slide under shapes without damage.
Quality Cutters
Sharp, well-designed cutters make the technique work. Stainless steel sets or resin 3D-printed cutters with beveled edges give the cleanest results.
Needle Tool
For popping trapped air bubbles under the wrap before cutting. Small investment, prevents frustrating trapped air pockets.
For high-volume makers cutting dozens of shapes per session, a few batching habits keep things moving: pre-tear eight to ten wrap pieces at session start, chill multiple slabs together and rotate as each warms, and reserve the wrap technique for the pieces where softer edges matter most.
Pre-Cut Your Wrap
Tear 8-10 pieces of cling wrap at the start of a session and stack them ready to go. Faster than stopping to tear each time.
Work in Temperature Batches
Condition multiple slabs, then chill them all together. Cut while they're firm, rotating between slabs as each warms up from handling.
Single-Use Wrap for Colored Clay
If you're working with mica powders, paints, or transfers, use fresh wrap for each color batch. Reused wrap can transfer pigments between pieces.
Cornstarch for Speed Cuts
When you need 50 of the same shape and don't care about pillow edges, cornstarch is faster than wrap. Reserve the wrap technique for the pieces where softer edges matter most.
Take the next step
Continue the series with the next guide in this path.