Polymer Clay Collar Necklaces, Bibs, Cuffs, and Curved Bases
Statement collars stop looking intentional when the neckline arc is guessed too late, the front pieces are treated like loose pendants, or the collar can flatten or relax in the oven. This guide explains the curved-base build order behind rigid collar necklaces and layered bib pieces.
In brief
Key takeaways
- 1Solve the neckline arc before you cut the full set of front scallops or bib pieces
- 2Decide early whether the front is one rigid collar base or a set of truly loose hanging parts
- 3Build layered fronts from the lower row upward so the reveal stays even across the neckline
- 4For many rigid collars, add the clasp after cure, but plan the hardware earlier if it affects structure or spacing
A statement collar necklace is not just a big pendant multiplied. It is a curved object that has to follow the neckline on purpose. When that curve is guessed too late, the whole piece starts fighting the neck instead of framing it.
The cleaner build order is to solve the collar arc first, then decide how the visible front pieces sit on that arc, then plan the rear clasp path early and attach after cure only if the closure does not affect spacing, support, or structure.
Start With The Neckline Arc
The first real build decision is the curve, not the front decoration.
If the collar is intended to follow a close neckline curve, plan that curve before you cut the full set of front shapes. That is what helps you check the center-front balance before bake and reduces the chance that the side pieces flare away from the body.
Decide Whether The Front Is One Base Or Many Loose Parts
Some collar pieces are one rigid curved base with decoration on top. Others are true chain-led parts. Do not confuse the two.
This matters because the construction order changes completely. A rigid collar wants the front arc solved first. Loose pendants can be cut and assembled later. Many lookbook scallop collars visually read as one supported front, not as many free-hanging tabs. Treat that as a recreation choice unless the source shows the construction.
Maker reference
Maker reference only. Verify brand instructions, seller details, dimensions, and safety guidance for your own setup.
Affiliate note
Some links in this article are affiliate links. If you buy through them, we may earn a small commission at no extra cost to you. As an Amazon Associate I earn from qualifying purchases.
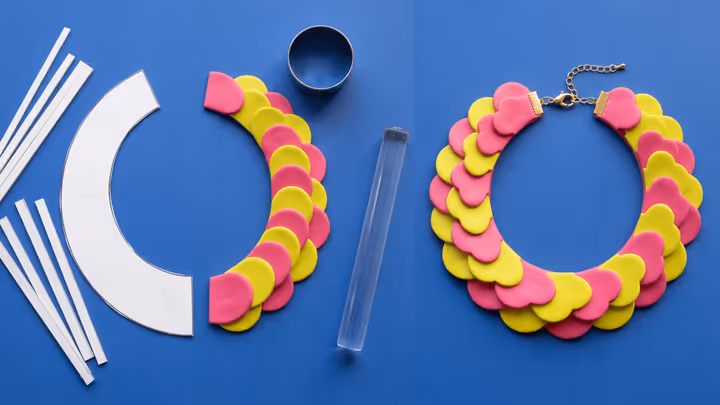
Cut The Repeated Front Pieces In Batches
Once the curve is planned, cut the full set of scallops, discs, or petal pieces before you start attaching them.
Round clay cutter set is useful when the collar depends on repeated scallops that need to look intentional from center front all the way to the clasp zones.
Keep The Base Thickness Honest
Base thickness is a tradeoff between bulk, flexibility, and support.
Polymer clay thickness guide strips help you keep the base and the front pieces consistent enough that the collar still feels deliberate after baking.
Very thick collars can feel heavier, while very thin or wide spans may flex more than you want, so test the curve with your clay line and support setup before you commit to the full front.
Layer The Front From The Bottom Row Up
If the design uses overlapping rows, place the lower row first and let the upper row hide only as much of it as the reference needs.
This is how layered scallop collars stay readable. If the rows are built out of order, the reveal changes from side to side and the collar stops feeling centered.
Support The Curve Through The Bake
If the necklace depends on a shaped neckline arc, test it on a suitable support during bake so the collar has help holding that curve.
A wide front can relax when it gets warm, especially if there are layered pieces pulling weight toward the center. A simple curved support may help on a test piece, but broad or layered fronts still need an oven-safe support matched to the clay line and actual weight. Confirm the result against your clay line's package instructions and your real oven temperature.
Attach The Clasp After The Front Arc Is Checked
Rear hardware can be a finishing step when anchor placement, hole spacing, and closure load were planned before cure.
Lobster clasp and extender chain set is useful once the collar front is cured and you are ready to test extender length and clasp placement at the back.
Use This Guide With The Lookbook
If an item page mentions a rigid collar base, layered scallops, neckline support, or a rear clasp added after cure, it is pointing back to this guide.
Use it first for:
- collar necklaces and bib-style statement pieces
- layered scallop fronts on a curved base
- rigid cuffs or necklace fronts that need one clean arc before the hardware goes on
Take the next step
Continue the series with the next guide in this path.