In brief
Key takeaways
- 1Mokume gane is a Japanese layered-slice technique that polymer clay makers adapt with stacked sheets and thin slices
- 2For mokume gane, start with two or three high-contrast colors plus one metallic or translucent accent
- 3For mokume gane, chill the block briefly before slicing if the layers start to smear
- 4Deeper distortion usually creates busier, less predictable patterns, so test small blocks before scaling up
Mokume gane (pronounced moh-koo-may gah-nay) is a Japanese layered-slice technique that polymer clay makers adapt for wood-grain, stone-like, or topographic patterns. It can also be a practical way to use mixed leftovers once the clay is conditioned to a similar softness.
In polymer clay, mokume gane usually starts with thin sheets of contrasting colors, sometimes with metallic or translucent accents between them. Makers stack the sheets, press impressions into the block, compress it back together, then shave thin slices from the surface to reveal the distorted layers underneath. The exact pattern depends on clay firmness, blade control, and how deeply you distort the stack.
Maker reference
Maker reference only. Verify brand instructions, seller details, dimensions, and safety guidance for your own setup.
Affiliate note
Some links in this article are affiliate links. If you buy through them, we may earn a small commission at no extra cost to you. As an Amazon Associate I earn from qualifying purchases.
What You Need
Start with 3-4 contrasting clay colors, optional metallic or translucent accents, texture tools for distortion, and a sharp flexible tissue blade for cleaner slicing.
- 3-4 colors of clay (contrasting colors usually read most clearly, for example black, white, gold, and teal). Premo starter colors are one practical option if you want several contrast shades in one order.
- Metal Leaf: Gold, Silver, or Copper leaf can add shimmer between layers, but it is optional.
- Texture Tools: Anything that makes an impression - stamps, needle tools, ends of paintbrushes, or specialized texture mats.
- Fresh Blade: A fresh flexible tissue blade makes thin slices easier and reduces drag across the pattern.
| Color Combo | Metal Leaf | Result | Difficulty |
|---|---|---|---|
| Black + White + Ecru | Gold | Classic, dramatic contrast | Beginner |
| Navy + Cream + Teal | Copper | Ocean-inspired, moody | Beginner |
| Terracotta + Sage + Sand | Gold | Earthy, warm tones | Intermediate |
| Translucent + Pearl + Black | Silver | Faux agate with depth | Intermediate |
| Scrap clay mix | Any | Unpredictable, unique | Beginner |
See this technique in finished pieces
Browse lookbook entries that use this approach so you can compare shape, materials, and overall direction.
The Process
Stack colored clay layers, add metallic or translucent accents if you want them, distort the block with tools, compress it together, then shave thin slices to reveal the layered pattern.
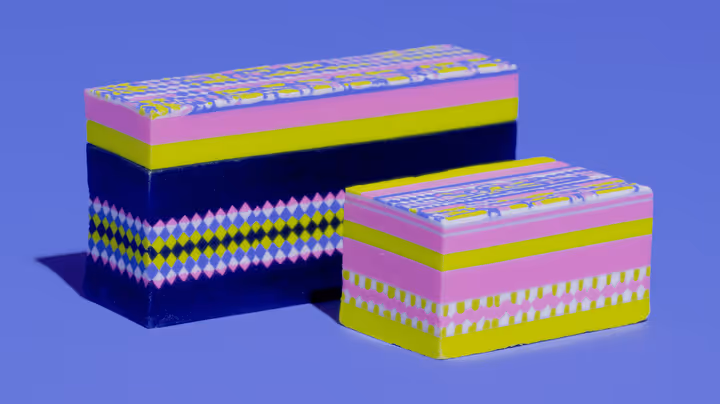
1. The Stack
Condition each color and roll them out on the thickest setting of your pasta machine (or use an acrylic roller to about 3mm thickness). Stack them on top of each other. Add a layer of metal leaf between some layers for sparkle. Cut the stack in half, stack it again. Repeat until you have a nice tall block (about 1 inch high).
2. The Distortion (The Fun Part)
Now, ruin the stack! Use your tools to poke holes, drag lines, and push deep into the clay. Don't be shy. Push all the way down to the bottom layers. You want to force the bottom colors up and the top colors down.
Tip: Use the back of a paintbrush to push 3 distinct holes, then use a blade to cut lines connecting them. You can also press texture sheets into the top before distorting.
3. The Healing
Push the block back together. Squeeze it from the sides to close up the holes you made. Gently roll over the top with your acrylic roller to flatten it slightly. The clay will "heal" the holes but the color distortion remains trapped inside.
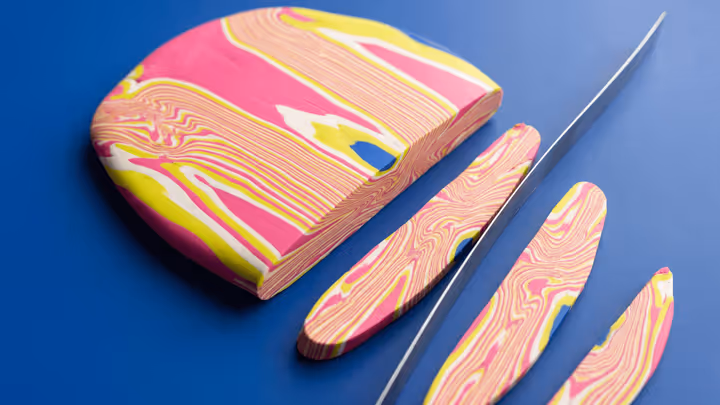
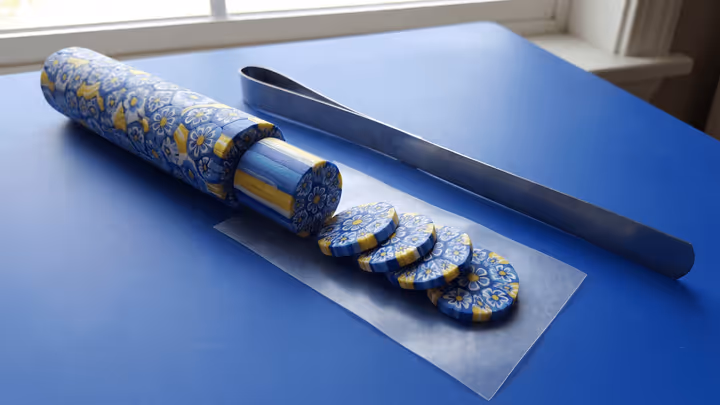
4. The Slice (The Reveal)
This is the magic moment. Flex your sharp blade slightly (creating a slight curve) and shave off a very thin slice from the top of the block. Discard (or save) the first uneven slice.
As you slice deeper, you will see rings, swirls, and organic patterns appear where you distorted the layers. Keep slicing thin sheets. These sheets can now be applied to a base layer of scrap clay to create earrings, pendants, or slabs.
The cleanest mokume gane slices usually come from firm clay and a sharp blade. If the block starts smearing, give it a short chill before slicing so the layers hold their shape better. Use a fresh, flexible tissue blade with a slight curve, and slice in a single sweeping motion rather than sawing back and forth. Aim for slices thin enough to show the distorted layers clearly without tearing.
Troubleshooting
Smudged pattern? Your clay might be too soft (warm), or your blade too dull. Give the block a short chill before slicing and switch to a fresh blade if drag is still visible.
Thin, fragile slices? Apply each slice to a base sheet of conditioned scrap clay immediately after cutting. Press gently, then roll smooth.
Keep reading

How to Reverse Engineer Any Clay Design You See Online
Learn a structured way to study construction, layers, color choices, and finishing clues from a reference photo without copying it line for line.
Nerikomi for Polymer Clay: The Complete Guide to Japanese Layered Patterns
Master the ancient Japanese ceramic technique of nerikomi using polymer clay. Learn to create stunning layered patterns - spirals, checkerboards, and bullseyes - that run all the way through your jewelry pieces.
What Is a Polymer Clay Cane? Millefiori, Flower Canes, and Cane Slices Explained
A plain-English guide to polymer clay canes, millefiori, flower canes, reduction, slicing, and when to use a cane over a backing sheet instead of building the whole piece from patterned clay.