Polymer Clay Trinket Dishes, Forms, and Rims
Small decorative catchalls fail when the slab stretches unevenly, the rim thins out, or the dish is too deep for the scale. This guide covers the practical forming choices that keep polymer clay dishes shallow, decorative, and more predictable.
In brief
Key takeaways
- 1Start with an even slab, because wall thickness problems begin before the dish ever hits the form
- 2Use a shallow bowl form for many decorative catchalls, then shape scallops or rim details once the curve is seated
- 3Keep the dish supported during bake if the rim or wall still looks soft
- 4Keep polymer clay dishes decorative for jewelry, keys, and small keepsakes rather than food contact, and test any finish on a baked sample first
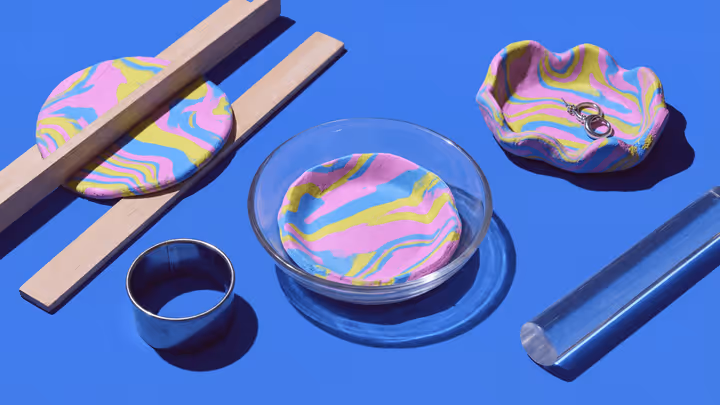
A decorative polymer clay trinket dish for rings, studs, keys, or small keepsakes should be shallow enough to feel intentional, sturdy enough to sit flat, and shaped cleanly enough that the rim looks designed instead of accidentally warped. Do not use polymer clay dishes for food or drink contact unless the clay and finish manufacturer supports that exact use.
The fix is simple: even slab first, shallow form second, rim shaping third, support during bake fourth. That order matters more than any one texture trick or finish product.
Maker reference
Maker reference only. Verify brand instructions, seller details, dimensions, and safety guidance for your own setup.
Affiliate note
Some links in this article are affiliate links. If you buy through them, we may earn a small commission at no extra cost to you. As an Amazon Associate I earn from qualifying purchases.
Start With An Even Slab
If the slab is uneven before you form it, the wall thickness and rim strength will stay uneven all the way through cure.
Acrylic roller plus thickness guide strips make this much easier than eyeballing the slab by hand.
For striped or color-joined dishes, cut the dish blank before the slab gets overworked. Too much handling stretches the seams and muddies the design before the bowl shape even starts.
Choose A Shallow Form
Many small polymer clay catchalls are easier to form when the dish stays shallow and broad instead of deep and steep.
Sculpey's ring-dish project uses a small bowl form as a decorative dish reference point. A shallower form often helps keep the walls from stretching too aggressively and often matches the use case better for rings, studs, keys, and small keepsakes.
Decorative only. These dishes are not food-safe. Do not use polymer clay dishes for food or drink contact unless the clay and finish manufacturer explicitly supports that use.
Shallow bowl form with clearly oven-safe material details helps keep the curve predictable while you shape the dish. If you plan to bake on the form, verify the exact material and size in the listing, confirm it is oven-safe for that use, keep it dedicated to clay work, and match the rim profile to the depth you want.
Shape The Rim After The Curve Is Seated
Press the slab into the form first, then pinch or refine the rim while the wall is supported.
That is how you keep the rim decorative without sacrificing strength. If you sculpt scallops before the dish is properly seated, you end up dragging the whole wall around and thinning the edge unevenly.
Keep The Dish Supported During Bake
If the rim still looks soft or delicate, leave the dish on the form through the bake instead of moving it to a flat tile at the last second.
Scalloped rims, pinched corners, and shallow walls often benefit from staying on their support while the clay cures. This is especially true when the design depends on a wavy lip or broad bands that would look wrong if the bowl flattened out.
Texture Last, Not First
Add sponge, cloth, or brush texture after the form is already seated and the rim is close to finished.
Texturing too early can stretch the slab, blur joined color bands, or make it harder to smooth the wall into the bowl form cleanly. Once the dish is in place, texture can help reinforce a handmade matte look without fighting the structure.
Why Many Dishes Look Better Matte
Many textured catchalls read cleaner matte, buffed, or only lightly sealed for decorative use. Heavy gloss can flatten the texture story and make the surface feel more artificial.
If the dish is smooth and polished, more shine may work. If the image pair shows grit, brushing, or rough handmade texture, keep the finish restrained and test it on a baked sample first. Do not treat glaze or sealer as making the dish food-safe or waterproof.
Use This Guide With The Lookbook
If an inspiration page mentions a bowl form, scalloped rim, or support during bake, it is pointing you back to this forming guide.
Use this guide first for:
- trinket dishes and ring catchalls
- scalloped or pinched rim builds
- striped, marbled, terrazzo, or texture-led dishes
Take the next step
Continue the series with the next guide in this path.