
In brief
Key takeaways
- 1Use 5 layers to build a working theory: base shape, technique stack, color, assembly order, and finish
- 2Work backwards from surface clues, but treat each clue as evidence rather than proof
- 3Mica shift is one possible explanation when a flat piece appears dimensional, but photos alone rarely prove it
- 4Document failed attempts - they teach more than successes
You save a clay design online and want to understand how it was probably built. The maker is not sharing the exact process, so all you have is a finished photo and a handful of visible clues.
A common frustration in polymer clay is the gap between "I love this design" and "I have a testable build path." The safest way to close that gap is to treat the photo as evidence, not proof, and build a working theory you can test with scrap clay.
Maker reference
Maker reference only. Verify brand instructions, seller details, dimensions, and safety guidance for your own setup.
Affiliate note
Some links in this article are affiliate links. If you buy through them, we may earn a small commission at no extra cost to you. As an Amazon Associate I earn from qualifying purchases.
The 5-Layer Analysis Method
You can often study a polymer clay design through five visible layers: base shape, technique stack, color construction, assembly order, and finish.
Most finished polymer clay pieces, even complex ones, can be studied through these five layers. Work through them systematically and keep track of which details are visible versus inferred.
Reverse engineering a polymer clay design requires analyzing five distinct layers in order: the base shape (slab, sculpted, or assembled), the technique stack (terrazzo, mokume gane, caning, mica shift, or stamping), the color construction (custom mixes, translucent additions, mica powders), the assembly order (what was added first through last), and the surface finish (sanding grit, buffing, or sealant).
Layer 1: The Base Shape
Before anything else, identify the foundational shape. Is it cut from a flat slab? A 3D sculpted form? Multiple pieces assembled?
- Look for edges: Sharp, clean edges can point to a cutter. Softer or irregular edges can point to hand-cut or sculpted work.
- Check uniformity: Near-identical pieces in a photo can suggest a cutter or mold. Small variations can suggest more hand-shaped steps.
- Identify thickness: Compare to known references in the photo, such as earring posts or fingers holding the piece.
Layer 2: The Technique Stack
Many finished pieces combine more than one technique. Common combinations include:
| Technique | Visual Clue | Key Giveaway |
|---|---|---|
| Terrazzo | Small chips in a solid or translucent base | Irregular colored fragments with sharp edges |
| Mokume Gane | Organic, wood-grain-like swirls | Metal leaf flashes visible in the pattern |
| Caning | Repetitive "sliced" patterns (flowers, geometrics) | Same pattern repeats across multiple pieces |
| Mica Shift | 3D depth effect on a flat surface | Shimmers and shifts when tilted in light |
| Stamping/Texture | Repeated pattern pressed into surface | Uniform depth, pattern matches a commercial stamp |
Layer 3: The Color Construction
Many finished pieces use some amount of color adjustment instead of straight-from-the-package color. Common clues include muted mixes, translucent additions, surface powders, metal leaf, or gradients, but a single photo rarely proves which path the maker actually used.
Colors in polymer clay are rarely "out of the wrapper." Analyze them:
- Muted tones: Can point to custom mixing, often with white, ecru, or a desaturating color adjustment.
- Translucency: Light passing through can suggest translucent clay mixed in, such as Cernit Translucent, but test pieces are the only reliable way to confirm.
- Shimmer: Could be mica clay, mica powder on the surface, or metal leaf.
- Gradient: Could come from a Skinner blend, layered color transitions, or later surface color.
Layer 4: The Assembly Order
This is where most people get stuck. You need to mentally "explode" the piece:
- What's on top? The last thing added is most visible.
- What's underneath? Base layers are often peeking out at edges.
- Where are the joins? Look for seams, overlaps, or slight color variations where pieces meet.
Layer 5: The Finish
The final surface treatment dramatically changes the look:
- High gloss: Usually some combination of finer sanding, buffing, or a compatible topcoat. A photo alone will not tell you which.
- Satin: Could come from light sanding, buffing, or a compatible finish system.
- Matte: May come from clay choice, light sanding, or simply skipping a gloss coat.
- Textured: No sanding, texture preserved from raw state.
See this technique in finished pieces
Browse lookbook entries that use this approach so you can compare shape, materials, and overall direction.
The Prototype Process
For image-based studies, prototype with scrap clay when you can, make a few quick attempts, and photograph each one so you can see what to adjust next.
Once you've analyzed all five layers, build a test piece:
- Start ugly: Use scrap clay for your first attempt. Don't waste your good colors on experiments.
- Document failures: Take photos of what went wrong. These are your most valuable learning tools.
- Iterate fast: Make 3-5 quick prototypes rather than one "perfect" piece.
Common Techniques Decoded
A lot of recognizable polymer clay looks can be studied through a handful of repeatable technique families: terrazzo chips, mokume gane swirls, sliced canes, mica-shift effects, or surface stamping.
Here is how to identify and test some of the most common technique families:
Three common families worth practicing are the agate-style look, the terrazzo-style look, and the marbled look. They are useful because each teaches a different clue-reading skill, not because every finished piece follows one exact recipe.
The "Agate" Look
What you're seeing: Bands of translucent color that glow when light hits them.
One likely recreation path: Layers of translucent clay tinted with small amounts of colored clay, stacked, sliced thin, and applied to a base. If you want more clarity, test finer wet sanding and buffing on scrap from the same clay line instead of assuming one universal grit target.
The "Terrazzo" Look
What you're seeing: Irregular colored chips suspended in a solid base.
One common recreation path: Bake scrap clay, chop it into tiny pieces, mix the chips into raw translucent or white clay, roll flat, and cut shapes. The pre-baked chips are less likely to smear when you roll.
The "Marbled" Look
What you're seeing: Swirling, organic color patterns.
One common recreation path: Stack colors, twist, fold, and repeat. Stop while the ribbons still read clearly or the mix can turn muddy fast.
Practice Exercise: Decode This Week
Pick one saved Pinterest pin, write down the base shape, technique, colors, finish, and assembly order, then build a scrap clay prototype.
Pick one design from your saved Pinterest pins. Write down:
- Base shape and how it was cut
- Primary technique used
- Secondary techniques (if any)
- Color mixing notes
- Finish type
- Assembly order (numbered list)
Then make a scrap clay prototype. Keep notes on what changed, what still feels uncertain, and which details you had to infer from the image.
Keep reading
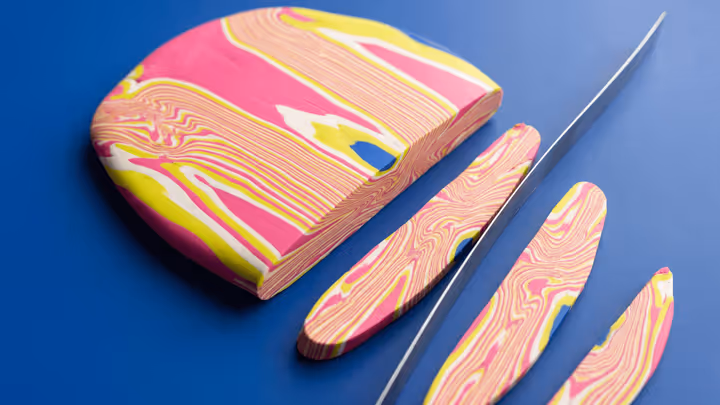
Mokume Gane in Polymer Clay
Learn a practical layered-slice method for wood-grain and stone-like patterns in polymer clay, with safer guidance on slice control and support.
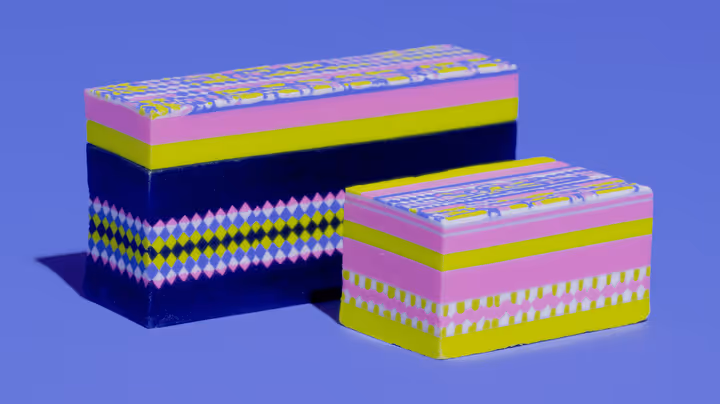
Nerikomi for Polymer Clay: The Complete Guide to Japanese Layered Patterns
Master the ancient Japanese ceramic technique of nerikomi using polymer clay. Learn to create stunning layered patterns - spirals, checkerboards, and bullseyes - that run all the way through your jewelry pieces.
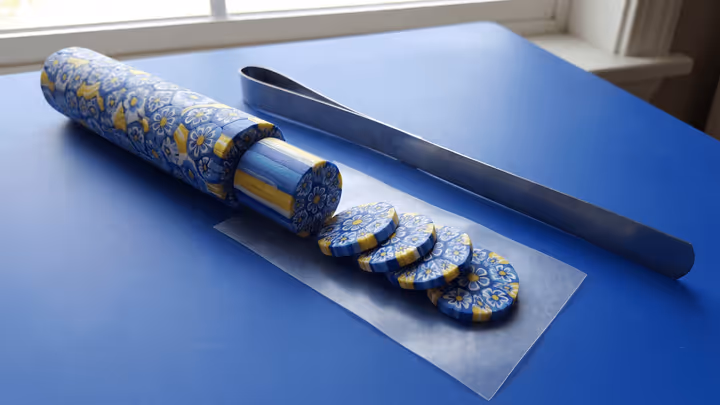
What Is a Polymer Clay Cane? Millefiori, Flower Canes, and Cane Slices Explained
A plain-English guide to polymer clay canes, millefiori, flower canes, reduction, slicing, and when to use a cane over a backing sheet instead of building the whole piece from patterned clay.