Nerikomi for Polymer Clay: The Complete Guide to Japanese Layered Patterns
Master the ancient Japanese ceramic technique of nerikomi using polymer clay. Learn to create stunning layered patterns - spirals, checkerboards, and bullseyes - that run all the way through your jewelry pieces.
In brief
Key takeaways
- 1Nerikomi relies on clean color boundaries, so reduce over-conditioning once sheets are pliable
- 2Stack, compress, and slice with a sharp tissue blade to avoid pattern drag and muddy edges
- 3Rest patterned blocks before slicing to improve definition and reduce distortion
- 4Bake test tiles for each pattern family to document shrinkage and color shift before production runs
There's a reason your social feed is filled with those mesmerizing layered polymer clay earrings - patterns that seem to glow from within, stripes that twist into tight spirals, checkerboards so crisp they look printed. These aren't surface decorations. They're nerikomi: an ancient Japanese ceramic technique that builds patterns directly into the clay itself.
The good news? Polymer clay is actually easier for nerikomi than traditional ceramics. No kiln, no shrinkage matching, no thermal expansion calculations. Just colored clay, your hands, and some smart technique. Let's master this together.
What Is Nerikomi? (And Why It Works So Well in Polymer Clay)
Nerikomi is a Japanese technique that builds colored patterns directly into the clay body so every slice reveals the same design throughout the entire piece.
Nerikomi (練り込み) literally means "to knead in" in Japanese. The technique dates back centuries - appearing in Tang dynasty China, ancient Egypt, and 18th-century English "agateware." But Japanese potters elevated it to an art form, creating intricate patterns that run completely through the clay body.
Here's the key concept: the pattern isn't painted on - it's built in. When you slice a nerikomi piece, every cut reveals the same design. The pattern exists throughout the material, not just on the surface.
In polymer clay circles, this technique is called caning. You build a patterned log (the "cane"), reduce it to your desired size, then slice it to reveal the design. Same concept, different material - and polymer clay has some major advantages.
Nerikomi (caning) in polymer clay has four advantages over traditional ceramics: zero shrinkage during curing means patterns stay exactly as built, no kiln is required (a standard home oven set to your clay line's recommended temperature works), all major PVC-based brands are compatible and can be mixed together, and uncured clay can be reworked indefinitely until you are satisfied with the pattern before baking.
Why Polymer Clay Beats Ceramics for Nerikomi
Traditional ceramic nerikomi is notoriously difficult. The biggest challenge? Shrinkage matching. Different colored ceramic clays shrink at different rates during firing. If your blue clay shrinks 12% and your white shrinks 14%, your beautiful checkerboard cracks apart in the kiln.
The Physics Advantage
Polymer clay doesn't shrink during curing. At all. This eliminates the primary failure mode of ceramic nerikomi. Your patterns stay exactly as you built them - no differential shrinkage, no cracking along color boundaries, no warped checkerboards.
Other polymer advantages:
- No kiln needed - your home oven works at the temperature on your clay's packaging
- Brand compatibility - all major brands are PVC-based and can be mixed
- Forgiveness - uncured clay can be reworked indefinitely
- Low cure temperature - minimal thermal stress on patterns
See this technique in finished pieces
Browse lookbook entries that use this approach so you can compare shape, materials, and overall direction.
Maker reference
Maker reference only. Verify brand instructions, seller details, dimensions, and safety guidance for your own setup.
Affiliate note
Some links in this article are affiliate links. If you buy through them, we may earn a small commission at no extra cost to you. As an Amazon Associate I earn from qualifying purchases.
Clay And Tools For Nerikomi
Premo Sculpey offers the best balance of workability and edge-holding for most canes, while Kato Polyclay is firmer and holds ultra-fine detail during reduction. Pair the right clay with a pasta machine, sharp tissue blades, an acrylic roller, ceramic tiles, and an oven thermometer and nerikomi becomes dramatically easier.
Not all polymer clays are created equal for caning. You need clay that holds crisp edges during reduction, slices cleanly, and cures with good flexibility. Here's what works.
Best Brands for Nerikomi Caning
Premo Sculpey - The workhorse choice. Good balance of firmness and workability. Excellent color range including translucents and metallics. Slices cleanly and cures flexible. Best for beginners and most projects.
Van Aken Kato Polyclay - The precision choice. Noticeably firmer than Premo. Holds ultra-fine detail during reduction. Excellent for complex, intricate canes. Requires more effort to condition but rewards you with the crispest patterns.
Fimo Professional - The reliable middle ground. Firmer than Fimo Soft, with consistent behavior across colors. Good for canes that need clean lines without Kato's conditioning effort.
Less Suited for Caning
Sculpey III is softer than Premo or Kato, which can cause patterns to blur during reduction. It works for solid-color backings and simple fills, but firmer lines hold detail better for nerikomi work. Follow the Sculpey III package directions for cure time and temperature to avoid thin sections baking unevenly.
| Brand | Firmness | Detail Holding | Conditioning Effort | Best For |
|---|---|---|---|---|
| Premo Sculpey | Medium | Good | Easy | Beginners, most projects |
| Kato Polyclay | Firm | Excellent | High | Complex, intricate canes |
| Fimo Professional | Medium-Firm | Good | Moderate | Clean lines, consistent colors |
| Sculpey III | Very Soft | Poor | Minimal | Less suited for caning (softer, may cure brittle thin) |
Can You Mix Brands?
Yes - and it's actually a useful technique. All major brands are PVC-based with compatible plasticizers. Mixing works because:
- Properties average out (soft + firm = medium)
- No chemical incompatibility between PVC formulations
- Cure temperatures sit in a similar range, but check each brand's package and bake at the temperature recommended for the line that needs the lowest setting
Pro tip: Mix 50% Premo with 50% Kato to get Premo's easy conditioning with better edge-holding during reduction.
Tools That Actually Matter
The right tools make nerikomi dramatically easier. The non-negotiables are a pasta machine for consistent sheets, a tissue blade set for clean slicing, an acrylic roller, ceramic tile work and baking surfaces, and an oven thermometer.
Pasta Machine - Essential for consistent sheet thickness and fast conditioning. Look for smooth (not ridged) rollers. Atlas 150 or Makin's Professional are common choices.
Tissue Blade Set - The single most important cane tool. Get both rigid (for straight cuts) and flexible (for curved slices). Thin, sharp, unserrated.
Acrylic Roller - Clear, rigid, smooth. Essential for compressing canes and rolling slabs without distortion.
Ceramic Tiles - Non-reactive work surface that goes straight into the oven. Add a few 6" tiles to the same Amazon cart as your clay tools so your work surface and baking surface are handled in one order.
Oven Thermometer - Critical. Home ovens lie. Under-baking leaves clay brittle; over-baking burns and discolors. Know your actual temperature.
A few additions earn their spot once you have the core kit: thin-walled metal shape cutters give cleaner edges than thick cookie cutters, clay softener revives stiff or crumbly clay with a few drops kneaded in, and a wet/dry sandpaper set progressing from 400 through 800, 1500, and 2000 grit gives a glass-smooth finishing surface that shows patterns clearly.
Essential Nerikomi Techniques
Four techniques form the basis of every nerikomi pattern: Skinner blends for gradients, jellyrolls for spirals, bullseyes for concentric circles, and stacked strips for checkerboards.
Every nerikomi pattern builds on a few fundamental techniques. Master these, and you can create infinite variations.
1. The Skinner Blend (For Gradients)
Named after polymer artist Judith Skinner, this technique creates smooth color gradients that form the foundation of many nerikomi patterns.
What you need:
- Pasta machine (Atlas 150 or similar)
- Two conditioned clay colors
- Tissue blade
Steps:
- Roll each color into a sheet of equal thickness (thickest pasta machine setting)
- Cut each sheet into a right-angled triangle
- Arrange triangles into a rectangle: Color A on one side, Color B on the other, meeting on the diagonal
- Run through pasta machine, same orientation each pass
- Fold in half (fold-to-fold, not end-to-end) and pass again
- Repeat 20-25 times until gradient is smooth
The result: a smooth gradient strip that transitions from Color A to Color B. Roll this into a jellyroll for shaded spirals, or stack multiple strips for ombré effects.
2. Jellyroll Canes (Spirals)
The classic spiral pattern - two or more colors wound together. Simple to make, stunning results.
Steps:
- Roll two contrasting colors into sheets of equal thickness
- Stack sheets and trim edges square
- Starting at one short edge, roll tightly, keeping the core straight
- Gently compress as you roll to eliminate air
- Roll the finished cane to smooth and even the diameter
Variations:
- Use a Skinner blend sheet for light-to-dark gradient spirals
- Stack 3-4 thin layers before rolling for complex striped spirals
- Add a solid-color outer wrap for a bordered effect
3. Bullseye Canes (Concentric Circles)
Rings within rings - useful for eyes, flowers, spots, and target patterns.
Steps:
- Roll a solid log in your core color
- Roll a sheet in your second color
- Wrap the sheet tightly around the log, trimming overlap
- Roll gently to fuse the seam
- Repeat with additional colors as desired
The physics here matters: each ring is a concentric cylinder. In ceramics, faster-shrinking inner cores crack apart. In polymer? No shrinkage = no problem. Your rings stay evenly concentric.
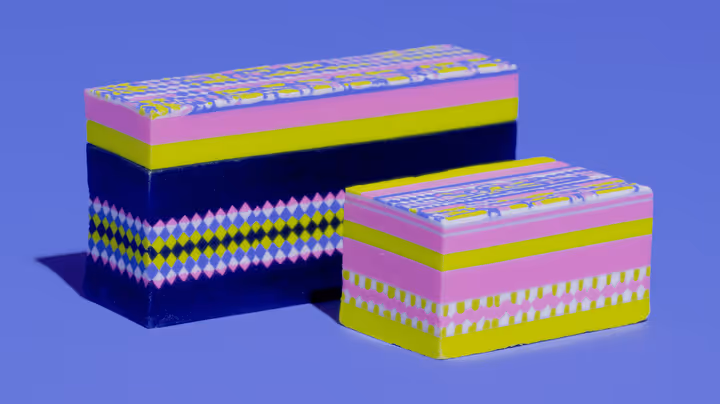
4. Checkerboard / Ichimatsu Patterns
The classic Japanese ichimatsu pattern - alternating squares in two colors. This is where polymer clay nerikomi really shines.
Steps:
- Condition two colors and roll into sheets of equal thickness (2-3mm)
- Stack sheets (e.g., black over white) and trim to a neat rectangle
- Cut the stack into equal strips (width = height of your squares)
- Flip every other strip so colors alternate (black-white, white-black)
- Press strips together firmly, eliminating gaps
- Cut crosswise again and restack to refine the check size
- Compress the block evenly with an acrylic roller
The Rest Period
After building any complex cane, let it rest for 15-30 minutes (or chill briefly in the fridge). This equalizes plasticizer distribution and firms the clay slightly, resulting in cleaner reduction and slicing.
Reducing Canes Without Distortion
Reduce canes by working from the center outward with gentle pressure, rotating a quarter-turn after every few rolls, and trimming the distorted ends before slicing.
You've built a beautiful cane. Now you need to make it smaller while keeping the pattern crisp. This is where most beginners struggle - and where technique matters most.
Proper cane reduction requires working from the center outward with light, even pressure while rotating a quarter-turn after every few rolls. The five most common reduction mistakes are pulling from the ends only (creates hourglass distortion), rolling in one direction (causes spiral twist), working with clay that is too warm (blurs patterns), uneven conditioning between colors (one stretches more than others), and reducing cold clay too fast (causes internal cracking).
The Right Way to Reduce
- Pre-shape: Gently compress the cane into its final cross-section shape (round, square, triangle) before reducing
- Work from the center: Place the cane on a smooth ceramic tile . With flat hands, press and gently roll from the middle outward
- Rotate constantly: Turn the cane a quarter-turn after every few rolls. Alternate directions to prevent spiral twisting
- Light pressure, many passes: Heavy pressure warps patterns. Use gentle, repeated strokes instead
- Trim the ends: The first and last 3-5mm of any reduced cane are distorted. Trim and discard (or add to your scrap cane)
Common Reduction Mistakes
| Problem | Cause | Fix |
|---|---|---|
| Hourglass shape | Pulling from ends only | Work from center outward |
| Spiral twist in pattern | Rolling in one direction | Alternate rotation direction |
| Blurred, muddy pattern | Clay too soft/warm | Chill cane, use firmer brand |
| One color stretches more | Uneven conditioning | Condition all to same softness |
| Internal cracking | Cold clay, fast reduction | Warm slightly, go slower |
Best Products And Cane Efficiency
Flat dangle earrings, studs, and pendants showcase nerikomi patterns best because their large flat surfaces display the full cane slice clearly, and cutting in a smart order plus backing thin slices stretches every hand-built cane further.
Nerikomi patterns look best on flat surfaces where the full cane slice is visible. Here's what sells - and what showcases your work.
The best products for showcasing nerikomi patterns have large, flat surfaces: statement dangle earrings (arches, ovals, rectangles), flat studs (8-12mm), pendants, and coasters. Disc and lentil beads also work well because they display the cane slice on both faces. Avoid very small items or heavily faceted shapes where the pattern detail becomes muddy and loses visual impact.
Statement Earrings (Top Seller)
Flat dangle shapes dominate handmade bestseller lists for good reason: they show patterns beautifully and make a visual impact.
- Best shapes: Arches, ovals, rectangles, organic "blob" shapes
- Why they work: Large flat area displays full cane slice; lightweight for comfortable wear
- Efficiency: Cut shapes tightly from a patterned slab; use scrap for studs
Flat Studs
Simple round or geometric studs with a single cane slice on top.
- Best shapes: Circles (8-12mm), hexagons, squares with rounded corners
- Pro tip: Use a thin slice (1-2mm) over a solid-color base for strength and to stretch your cane further
- Efficiency: Cut in tight grids; minimal waste
Pendants
Larger flat pendants give you a "canvas" for complex nerikomi work.
- Best shapes: Ovals, circles, rectangles, organic pebble forms
- Donut pendants: Punch out the center and use it as a matching stud - zero waste
- Bar pendants: Excellent for striped and gradient canes
Coasters & Home Decor
Coasters are the sleeper hit of nerikomi work - huge flat area, excellent pattern visibility, and strong gift-market appeal.
- Method: Tile cane slices edge-to-edge on a slab, then cut coaster shapes
- Finish: Seal with Varathane water-based polyurethane for durability
- Sell as sets: Matching pattern sets make the design story feel more complete
Trinket Dishes
Small dishes formed from patterned slabs - great gift items.
- Method: Drape patterned slab over a curved form (bowl, ball) during baking
- Best shapes: Hexagons, circles, organic edges
- Best fit: Gift-ready pieces that sell well in sets
Beads
Some bead shapes showcase nerikomi better than others.
- Disc/lentil beads: Show full cane slice on both faces - ideal
- Tube beads: Great for striped and spiral canes (pattern on sides)
- Round beads: Make directly from reduced bullseye canes - pattern runs through
- Avoid: Very small or heavily faceted beads where patterns become muddy
Finishing And Troubleshooting
Wet sand through progressive grits from four hundred to two thousand, then buff with a Dremel muslin wheel for a glass-smooth finish that makes patterns glow.
A smooth finish makes your nerikomi patterns pop. Here is a simple finishing path.
Sanding Sequence
- 400 or 600 grit: Remove major irregularities and flatten surface
- 800-1000 grit: Refine scratches
- 1500-2000 grit: Prepare for buffing (optional: 2500-3000 for extra gloss)
Always wet sand - keeps dust down and extends sandpaper life. Use a bowl of water and dip frequently.
Buffing (Optional)
For maximum shine without sealer:
- Use a Dremel with muslin buffing wheel at low-medium speed
- Keep the piece moving to avoid heat buildup
- No compound needed if you sanded to 2000+ grit
Sealers
Optional for most nerikomi work, but useful for added protection or consistent sheen.
- Varathane Crystal Clear - Water-based polyurethane. Thin coats, dries clear. Popular choice.
- Sculpey Gloss/Satin Glaze - Designed for polymer. Easy application.
Watch Your Sealers
Avoid solvent-based sealers and nail polish - they can stay tacky forever or attack the polymer. Always test on scrap first.
Troubleshooting Pattern, Cracking, And Bleed Issues
Most nerikomi failures come from three fixable causes: uneven clay conditioning causing distortion, insufficient compression trapping air, and under-baking leaving pieces brittle and cracked.
Pattern distortion. Squares becoming parallelograms usually means uneven pressure during reduction - use lighter, more even strokes and work from center outward. Circles becoming ovals means pressure was not equal from all directions, so roll on a tile and rotate frequently. Spirals unwinding means you were rolling in only one direction, so alternate rotation direction after every few strokes.
Cracking and splitting. Cracks along color boundaries are shrinkage mismatch in ceramics, but in polymer it is usually under-conditioning (clay too dry), trapped air (didn't compress well), or under-baking (clay didn't fully fuse). Brittle after baking means under-baked or wrong brand - use an oven thermometer, bake at correct temp for the full recommended time (longer is usually fine, hotter is not). If you are using Sculpey III for thin sections, consider switching to Premo or Kato, which hold up better at that thickness.
Color bleeding. Colors smearing into each other means clay is too soft or was worked too aggressively. Chill your cane before slicing, use a sharp, clean blade, and let very soft clays rest on paper to leach slightly before building canes.
Maximizing Your Cane
Good canes take time to build. Cut largest pieces from your patterned slab first, then progressively smaller ones, use thin slices over solid backings, and blend all scraps into marbled canes. Here's how to get the most from every one.
Product Hierarchy
Cut your patterned slab in this order:
- Largest pieces first: Coasters, large pendants
- Medium pieces: Statement earrings, smaller pendants
- Small pieces: Studs, charms
- Scraps: Beads, or blend into a "scrap cane" for marbled pieces
The Backing Technique
Stretch your cane further by using thin slices (1-2mm) over a solid-color backing:
- Slice cane thin
- Apply slices to a solid sheet of coordinating color
- Roll gently to bond
- Cut shapes from the backed sheet
You get the pattern on top with structural support underneath - and your cane goes twice as far.
The Scrap Cane
Never throw away trimmings. Collect scraps from each project and blend into a marbled "scrap cane." These make beautiful:
- Simple studs and charms
- Spacer beads
- Backing sheets
- Surprise gradient effects
Taking It Further: Advanced Nerikomi Concepts
Kaleidoscope canes, pictorial landscape builds, mokume gane hybrid distortion, and mica shift integration are four advanced techniques that push nerikomi into true art territory.
Once you've mastered the basics, explore these advanced techniques:
Kaleidoscope Canes
Cut a complex cane into triangular sections, then mirror and reassemble for kaleidoscope symmetry.
Landscape Canes
Build pictorial scenes layer by layer - sky gradients, mountain wedges, water striations. The cross-section reveals a complete image.
Mokume Gane Hybrid
Combine nerikomi stacking with mokume gane's distortion technique: stack, distort with texture tools, slice thin layers for organic, wood-grain-like patterns.
Mica Shift Integration
Use metallic Premo Accents in your nerikomi stack. The mica particles align during processing, creating dimensional shimmer effects within your patterns.
Keep reading
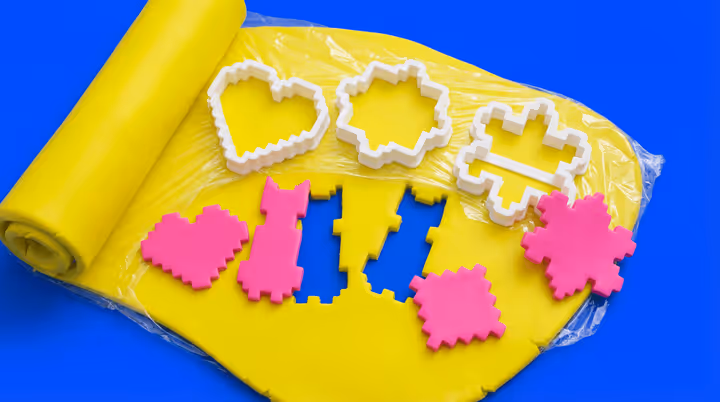
The Cling Wrap Trick for Smoother Polymer Clay Cutter Edges
If your cutters keep grabbing the clay or leaving rough edges, this guide explains when plastic wrap helps, which wraps are safer to use, when to skip it, and how to get a softer rounded edge when that suits the piece.
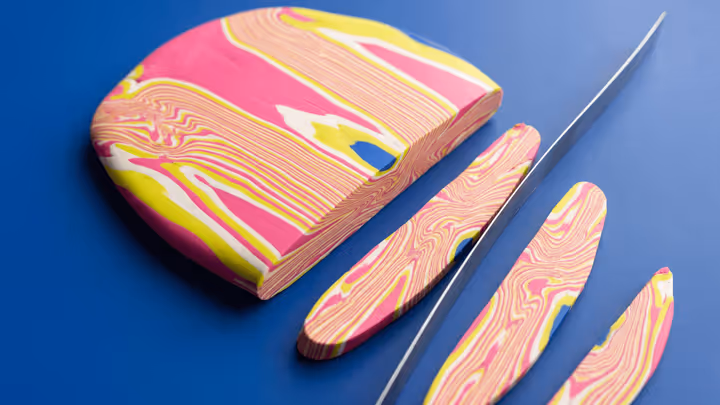
Mokume Gane in Polymer Clay
Learn a practical layered-slice method for wood-grain and stone-like patterns in polymer clay, with safer guidance on slice control and support.

How to Reverse Engineer Any Clay Design You See Online
Learn a structured way to study construction, layers, color choices, and finishing clues from a reference photo without copying it line for line.