
Through-hole clay card
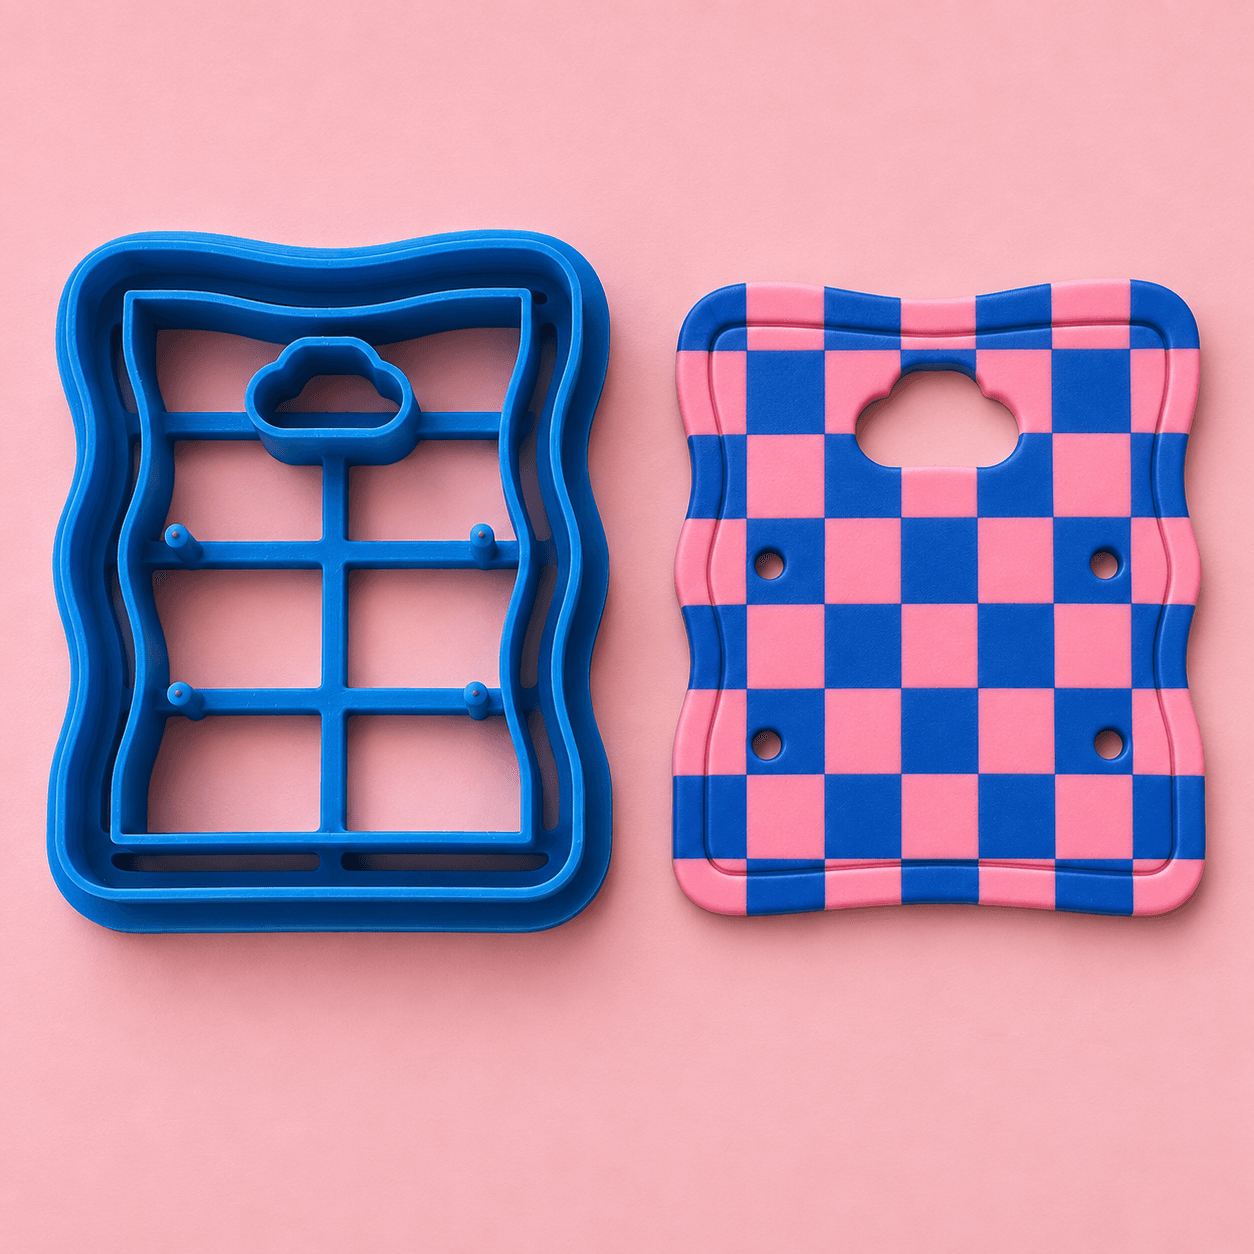
One press cuts the card shape, the hanger and all four earring holes in soft polymer clay. Lift out the small pieces, peel away the clay around the card and bake it.
Earring display card STL files
Make clay backing cards to sell with your earrings, or 3D print reusable cards for your own photos and displays.
Digital download: STL files to 3D print, plus a PDF guide.


Where it works
Card your finished jewellery together so you can move it from your worktable to photos, a display hook or an order. A clay card can go home with the customer; a printed card stays in your own display.

Hang your carded jewellery on a rack or pegboard with each pair facing forward. A fitted two-pair card lets customers see compact studs above matching or contrasting dangles in your collection. Leave space between cards for the drops to hang freely.

Make clay cards in your collection colours to sell or send with the earrings you make. Add suitable protective packing for delivery.

Make clay cards in colours and patterns that set off your earrings, or print reusable cards for your own photography. Arrange each pair so its edges and stacked layers stay visible against the card.
Three ways to make a card
Make the card from clay when you want it to go home with your customer. Print the card itself when it is for your own photos or display.
One press cuts the card shape, the hanger and all four earring holes in soft polymer clay. Lift out the small pieces, peel away the clay around the card and bake it.

The cutter shapes the card and marks the four holes. Knife-cut the hanger while the clay is soft, then bake and cool the card fully before hand-drilling the round holes.

Print the card flat in filament, with no clay or baking. Inspect the openings, load your jewellery and reuse it in your own home, shop or stall display and listing photos.
Start here
Choose around the earrings you want to show, then make one card before a batch. Large has room for compact studs above dangles where both pairs fit; Small has stud holes and Medium has ear-wire holes.
Forms the hanger and round holes before baking. Lift out the small clay plugs while the card stays flat.
Use this route when tiny raw-clay plugs are difficult to clear without stretching their holes.
A reusable card for your own photos and displays. Inspect the openings and fit your findings before loading it.
Nine STL files, an illustrated PDF guide and the Maker Licence. Each card size has a card you can 3D print and two cutters for making the card from polymer clay.


Every card has a cloud-shaped hanger and two rows of holes. Large has an upper stud row and a lower ear-wire row for a fitted two-pair display. Small has two stud rows and Medium two ear-wire rows; choose the jewellery around those hole sizes and the available space.
20 mm at the outlines' scale. Not an actual-size template.
| Outline to scale | Size | Card (W x H) | Use it for |
|---|---|---|---|
| Small | 45 x 55 mm | Compact studs up to about 17 mm wide and 12 mm tall. Check both rows together for overlap and access to the backs. | |
| Medium | 55 x 75 mm | Ear-wire drops up to about 19 mm wide, with about 12 mm of jewellery below each hole. Compare the full outline of both pairs before choosing this card. | |
| Large | 70 x 95 mm | The clearest starting choice for compact relief or layered studs above dangles. Check both pairs together for overlap and rear access to the backs. |
The illustrated PDF guide has every step, including the drill-mark method.

Step 01
Roll your polymer clay to an even, measured 2.0 mm slab. Press the cutter straight down until the cutting walls reach the work surface, then lift it vertically. Keep the card flat while you clear the small plugs.
Press the through-hole cutter level into the lilac slab.Help with this step

Step 02
With the card flat on the tile, lift the small clay plug out of each round hole. Support the thin bridge above the hanger while lifting its plug, so it does not stretch. Once the openings are clear, peel away the surrounding clay.
Clear the hanger and four round plugs while the surrounding slab still supports the card; then peel the outside waste.
Step 03
Bake the card on its own, never in the plastic cutter. Follow your clay packet's directions and let the card cool fully on a flat surface. Fit compact studs in the upper row and dangles below where they have room. Fasten the backs, check all four earrings for overlap, then try the card on your display hook.
Upper stud backs and lower ear wires on the same two-pair card.Costing
Compare the estimated material cost of a clay card with a reusable 3D-printed card. Leftover clay can become marbled cards for the same collection; return clean outer waste to your clay supply. Scraps still use material, making time and oven energy, so include those when costing cards for customer orders.
| Card | Clay per card | Cards per block | Clay cost per card | 3D-printed card (PLA) | Printed card cost |
|---|---|---|---|---|---|
| Small | about 7.7 g | about 7 | Enter your price | about 3.6 g | Enter your price |
| Medium | about 13 g | about 4 | Enter your price | about 6.0 g | Enter your price |
| Large | about 21 g | about 2 | Enter your price | about 10 g | Enter your price |
Clay weights estimate the finished card at a 2.0 mm slab, excluding outer waste and hole plugs, using about 1.7 g per cubic centimetre for Sculpey Premo and about 15 percent less for Sculpey Soufflé (a same-size block weighs 57 g and 48 g). Printed card weights come from the card files printed solid in PLA at about 1.24 g per cubic centimetre. Weigh your first card to confirm, then add oven time and your own time to your costing.
Maker tips
Make one card with the earrings you want to show before cutting a batch. You can see whether the colours work together and the earrings have enough room.
Roll the leftover clay from a batch of earrings into one marbled slab and cut several cards at once.
Make it your own
Try a plain card, a patterned slab or a pressed mark with your own jewellery.

Use the Large card to show compact studs above dangles when both pairs fit. Repeat a colour across the two designs, or use a contrasting pair to show another way to wear your collection.

Choose a plain card colour when you want raised details and contrasting jewellery colours to remain easy to see.

Hold the earrings over your checked or marbled slab before cutting the card. Choose an area where the pattern leaves their outlines visible. The checker card is a colour and pattern idea.

A marbled clay backing card with Eye studs and Flame drops, arranged in a gift box.

A yellow clay backing card with recessed lettering and two pairs of pink star studs.
Use your own stamps or lettering tools to add a name or small mark before baking. These optional tools and personalised files are not included in the kit.
Press a friend's name or a short note into the card, so the earrings you made them arrive with a message they can keep.
Stamp a star, a tree or a name on each card and tuck the pairs under the tree, ready to give.
Earrings on a card with each guest's name double as a place card and a favour. Add the couple's initials or the date for a wedding.
Use a logo stamp to make a shallow mark inside the border before baking. Keep it away from the hanger bridge and earring holes. A small brand mark leaves the jewellery as the main subject while identifying your shop.
Hang the cards on the rack from the Earring Display Stand Kit, or show single pairs on a T-bar stand. Both are separate downloads.
What you will need
Use the tools you already own. Choose the card you are making to see what it needs, then check the shared 3D printing supplies below.
Links marked "Affiliate link" may earn us a commission at no extra cost to you. Check sizes and materials before checkout.
What are you making?
For the coloured or patterned cards. Condition it according to the packet instructions and keep the cut card supported flat when clearing the holes.
Rolls the clay into an even slab.
A matched pair of 2.0 mm rails keeps the roller at the slab target. Measure the rolled clay before cutting.
After cutting, support the card flat for baking. Use baking paper if your clay maker recommends it for the chosen baking surface; cut on the smooth work surface taught in the guide.
Checks your oven matches the temperature on the clay packet.
Plus the clay, roller, guides and baking supplies from the through-hole card.
Cuts out the marked hanger while the clay is still soft.
A small hand drill for the four round holes once the card has baked and cooled. Match the bits to the two card hole sizes under Exact sizes; many micro-bit sets stop below them, so check the set or buy those two bits singly.
In a colour that suits your shop and your product photos.
Every route starts with a 3D print.
Prints the STL files. A printer you already own, or a local 3D printing service, is enough.
For the cutters, and for the cards if you print them.
Check the printed holes and parts against the sizes in the guide before you make a batch.
Conditions clay and rolls even slabs far faster than a hand roller. Keep it for clay only.
Reference
The modelled measurements and starting settings. Printed parts vary a little with your printer, filament and slicer.
Yes, where the jewellery fits. Large has 2.2 mm upper holes for compact relief or layered studs and 2.6 mm lower holes for dangles. Fit all four earrings together: they must not touch, the backs must fasten behind the card, and the drops need room below. Small has two stud rows; Medium has two ear-wire rows. Choose smaller jewellery around those hole sizes and row spacing.
Yes. Finished polymer clay cards made with the cutters may be sold or accompany your jewellery under the included Maker Licence. Add suitable protective packing for delivery. Keep directly 3D-printed cards and cutters for use in your own studio or business; they cannot be sold or given to customers.
No. These are flat cards for your own display hook, rack or photography setup. Check the hanger opening against that support. A card is not shipping protection for jewellery.
Start with through-hole if you want to cut the hanger and round holes before baking. Choose drill-mark if the small raw-clay plugs are difficult to lift without distorting the card: knife-cut the hanger while soft, then drill the round holes after baking and cooling.
No. These are 3D-printable polymer clay cutters, not paper punches or cardstock templates.
Yes. Send the card or cutter files with the guide for a private 3D print, at the settings in the guide. Check one finished card with your jewellery before ordering more. The service must not reuse, publish, share or resell the files.
No. They are adult polymer clay tools, not toys, cookie cutters, or food-safe tools. Keep them separate from food preparation and away from ovens, hot surfaces, and open flame.
Use 3D-printed cards and cutters in your own studio or jewellery business, including home displays, listing photos, shops and stalls. Finished clay cards made with the cutters may be sold or accompany your jewellery. Do not sell, gift or distribute printed cards or cutters, or share or resell the files. Full terms are in the included Maker Licence.
If a file is missing, won't open or doesn't match the listing, message us through Etsy messages with the kit name and filename, and we'll put it right.
Message us on Etsy